
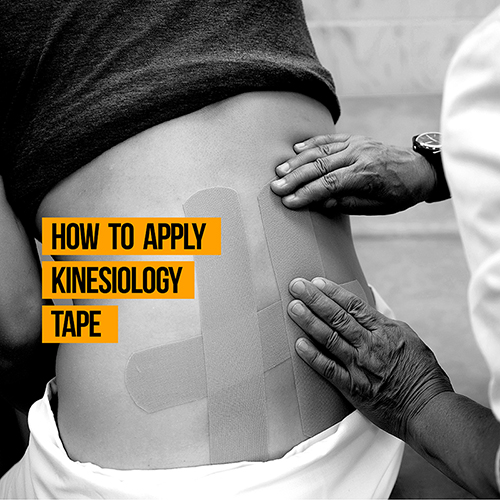
You’ve heard of Kinesiology Tape, or K Tape as it’s commonly known, but how exactly do you use it? Let us run you through the basics.
Before we start, here’s a few terms to be aware of:
Anchor – The correct terminology for the end of the tape, usually the last two or three inches. It is used as the base with which to apply the tape. The anchor should never be stretched, ensure it is always applied without tension.
Stretch – Usually, you won’t want to extend the tape to its full stretching capability when applying, but most instructions will request at least some degree of stretch. It could be described as little to no stretching, light stretching or moderate stretching. Or you could see percentages, such as 50% for stretching to half of the tape’s full stretch, 25% for between none and half, and 75% between half and full stretch, and so on.
Flex – If you’re asked to flex and limb or joint, it simply means to extend the muscle or bend the joint. ‘Dorsiflex’ refers to the opposite, for example, with an ankle, it would mean bending it backwards.
Applying K-Tape can be tricky to get the hang of at first, and taping those hard to reach areas such as your back or shoulder might require some assistance, but generally, application is pretty simple when you get used to it. Here’s some handy tips:
- Before you do anything, make sure your skin is clean, dry and free of any oils, lotions or creams. This will enable the tape to stick more securely and ensure you don’t have the ends peeling off.
- Don’t apply kinesiology tape to damaged or broken skin, and if your skin is particularly sensitive, try testing out a small section for a period of around 24 hours to check that you don’t suffer any ill-effects before applying a full taping job. Also, make sure you give it at least an hour after applying if you plan on swimming while wearing.
- It’s not always necessary to stretch the tape while applying, but you will generally need to stretch the area of the body which you’re applying it to, unless it’s a joint, in which case you should bend it rather than extend it.
- A good practice after cutting the tape to whichever shape you want, is to round off the tape by cutting off the corners.
- Once you’ve done that, peel away the backing of the tape around two or three inches down the piece you cut to make an anchor point.
- Apply this anchor to the skin first, avoiding any contact with previously placed strips, while also making sure not to stretch the anchor point, otherwise it won’t stick properly.
- Spread the tape over the designated body pat, stretching it as much or as little as you are instructed. Once it’s stuck down, rub it all over to activate the head adhesive and seal a strong bond between the skin and the tape.
- Try not to allow the tape to wrinkle, as this could create an unwanted pressure point.
Let’s remind you of the shapes you’ll need to know about before taping anything up.
Common Kinesiology Tape Shapes
The I
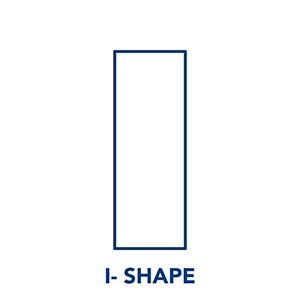
A standard strip of tape with no cuts or alterations. Kinesiology tape is generally manufactured in a role of I strips. Particularly effective when applied to injured muscles.
The Y

A strip of I tape which has been cut down the middle to produce two ‘tails’, but still remains attached at the end.
The Donut

Achieved by taking a strip of I tape, folding it in half and cutting down the folded centre instead of from the ends. When unfolded, there will be a large ‘hole’ in the middle yet the ends are all still joined – like a donut. This technique is often seen on the knee, when the kneecap occupies the donut’s hole and the donut’s sides are taped around it.