
Tendonopathy
Kader et al reviewed almost 350 articles to provide an interesting review of the anatomy, pathology and management of Achilles tendon problems in the British Journal of Sports Medicine. The article is comprehensive and provides essential reading for all clinicians who specialise in Sports Medicine. It also provides interesting information for those people, sporting or otherwise, who are suffering from Achilles tendon dysfunction.
You’ll note we don’t refer exclusively to sports participants, as the authors point out that although those involved in running sports are particularly susceptible, non-sporting individuals can also suffer from Achilles tendon problems. One of the biggest factors associated with non-sporting acquisition of Achilles tendon problems (and tendon problems in general) is the use of Quinolone antibiotics (such as Ciproxin, Raxar, Cinobac, Tavanic, Mictral, Utinor and Taravid) that are prescribed for urinary tract or chest infections. Advice published by the British Medical Association states that at the first sign of pain in a tendon, patients should discontinue the Quinilone medication and rest the affected tendon.
In the title of the article, Kader et al refer to ‘tendonopathy’ as an umbrella term for tendon dysfunction. This includes the conditions of ‘tendonitis’ and ‘tendonosis’. Tendonitis is inflammation of a tendon, whereas tendonosis refers to degeneration of a tendon. Kader et al cite studies of tendon cell health which conclude that most Achilles tendonopathies are degenerative in nature and therefore termed Achilles tendonosis. In fact, this research shows that Achilles tendonosis is much more widespread than Achilles tendonitis, the term that was historically given to all Achilles tendon problems.
The authors cite previous research by Jozsa and Kannus (1997), that defines tendonosis as intratendinous degeneration – breakdown of tendon tissue. The authors also cite Leadbetter (1992) who proposed that tendinosis is a failure of cell matrix adaptation to trauma because of an imbalance between matrix degeneration and synthesis. Put simply, this means tendon healing can’t keep pace with tendon damage.
Kader et al state that changes in training pattern, poor technique, previous injuries, footwear, and environmental factors such as training on hard, slippery, or slanting surfaces are factors that may predispose the athlete to Achilles tendinopathy. However, the authors point out that these are causation theories, and despite good face validity, a cause-effect relationship has not been demonstrated explicitily in controlled studies.
In summary, the authors stated that tendonopathy can probably be prevented by encouraging athletes and coaches to follow a sensible training programme. By seeking medical attention at an early stage the outcome may be improved, as treatment of tendonopathies is much more difficult when the condition becomes chronic.
First Aid
The first aid kits and sports first aid equipment by PhysioRoom are designed for a variety of uses, be it emergency aids during travel, at school, in the workplace, at leisure centres or at sports clubs. Essential first aid items for team sports such as football, rugby, hockey, basketball, Gaelic football, cricket and lacrosse can all be found in this range which provides everything needed for your physio bag. Physio bags may also be known as pitch side bag, run on bag or touchline bag depending on the sport. For all the essential first aid equipment a sports physiotherapist could ever need, look no further than PhysioRooms sports first aid kits range. This range includes products equipped with crepe bandages, fabric dressings, sports tape, triangular bandages, vinyl gloves, safety pins, wound wash, instant ice packs, sterile dressings, Vaseline and freeze spray. So make sure you are prepared for all sport related injuries by with a sports first aid kit.
Tennis Elbow Injury Explained
Tennis Elbow (Lateral Epicondylitis) is a common cause of elbow pain. Tennis Elbow is characterised by pain over the outer side of the elbow, which may radiate down the forearm. Despite the name, Tennis Elbow does not just afflict tennis professionals. In fact, this common elbow problem (it affects about 3% of the population) is most often associated with work-related activities, although racquet sports players are more prone to the condition and account for approximately 5% of all sufferers. Tennis Elbow is equally common in men and women, peaking in prevalence between the ages of 30 and 50.
Tennis Elbow usually begins as inflammation of the extensor tendons of the forearm as they attach to the Humerus (upper arm) bone, just above the elbow joint and function to bend the wrist back (extend). Typically this inflammation is caused by prolonged gripping activities such as hammering, driving screws, weight lifting, playing certain musical instruments, typing, canoeing, digging in the garden, driving and, of course, racquet sports.
If these activities are continued, then the inflammatory nature of Tennis Elbow can give rise to a chronic tendon problem that is characterised by pain, weakness and degeneration of the tendon. This elbow problem can then be very persistent and much more difficult to treat.
Tennis Elbow Signs & Symptoms
Tennis Elbow is very easy to diagnose. There is pain when the Lateral Epicondyle (outermost part of the elbow) is touched, and also if the elbow is straight and the hand is moved forward and back at the wrist. The elbow pain is made worse by gripping activities and, in some cases, simple things like turning a door handle or picking up a kettle can cause intense pain.
Tennis Elbow is differentiated from osteoarthritis of the elbow joint by x-ray investigation. Rheumatoid disease would usually affect more than one joint and is confirmed by blood tests. Pain in the elbow region can be referred from a problem in the neck or shoulder and these should be thoroughly examined in order to eliminate them before a diagnosis of Tennis Elbow is made.
Tennis Elbow Treatment
Since severe Tennis Elbow is an inflammatory condition, the obvious treatment would be a short course of non-steroidal anti-inflammatory drugs ( NSAIDs), prescribed by a doctor. Anti-Inflammatory Gel can also be helpful to relieve Tennis Elbow pain. Some doctors may even inject the affected area with a corticosteroid (a naturally occurring substance which can settle down inflammation).
Ice Packs are a cheap and effective treatment for Tennis Elbow, applied for ten minutes every couple of hours (never apply ice directly to the skin). The Aircast Elbow Cryo/Cuff is the most effective method of providing ice therapy is the professional’s choice. It can provide continuous ice cold water and compression for 6 to 8 hours to significantly reduce pain and inflammation.
In addition to anti inflammatory treatments, it is important that the patient reduces the strain on the painful area, otherwise the treatments can simply mask the pain while the condition gets worse. Ideally the patient should rest from aggravating activities for around two weeks to allow the inflammation to settle down. If it’s not possible to rest completely then a Compression Strap (elbow support) is very effective at reducing the stress on the painful area, whilst allowing the user to continue with activities. A Wrist Splint may also help reduce excessive movement of the wrist, allowing the inflammation to resolve. Often desk jobs where a lot of typing is carried out can aggravate this condition and a wrist splint or support to reduce the amount of wrist extension needed can serve as a long term solution to this overuse injury.
Once the severe elbow pain has subsided rehabilitation under the supervision of a Chartered Physiotherapist can cure the problem and prevent a recurrence. A progressive strengthening programme using Resistance Bands has been shown to be the best long term approach to Tennis Elbow.
In some cases of Tennis Elbow, conservative treatment can prove ineffective. This usually occurs in very longstanding cases, where the pain has been present for more than six months and where provocative movements can’t be limited or modified. In these cases, the inflammatory nature of the condition gives way to a chronic degeneration of the tendons of the extensor muscles.
This degeneration can be further exacerbated by long term use of NSAIDs and corticosteroid injections. For this reason, these should be avoided in longstanding cases. In these chronic, degenerative cases, where conservative treatment has not helped, then an orthopaedic surgeon may consider surgery to cure the problem.
Tennis Elbow Prevention
Tennis elbow is caused by gripping activities, and gripping either too hard or for too long can bring on the pain. Make sure the item that you are gripping, whether it’s a tennis racquet, bike handles, a hammer, or a canoe paddle, is the correct size for your hand. If it is too small it will cause you to grip too hard. If you play a racquet sport for the first time in a long while or you have to decorate a room in one weekend, make sure you take regular breaks and stretch the muscles which work over the wrist by doing ‘limp wrist’ and ‘policeman halting traffic’ type stretches.
For those who have suffered from Golfers Elbow in the past it may be a good idea to wear a Compression Strap (elbow support). These work by reducing the strain on the painful area by preventing the wrist muscles from contracting fully during sporting and work activities.
Soft Tissue Injuries
Dressler et al stated there has been an increased incidence of sports-related soft tissue injuries in older individuals. They believe that this is mainly due to increased sports participation in the over 50 age group, encouraged by health promotion initiatives. Previous research has suggested that age-related changes within soft tissues may predispose older individuals to conditions such as tendonopathies. This lab-based biomechanical study investigated the age-related changes in the patella tendon of rabbits.
Collagen fibril structure, collagen type and tensile strength of one year-old rabbits and four year-old rabbits were tested, with the researchers unaware of the age of each sample. Dressler et al found that the tensile strength of the older rabbit tendons was 27% less than in the younger specimens. The ultrastructure of the tendons was examined using an electron microscope to determine the diameter of the individual collagen fibrils. This showed that the younger rabbits had more ‘larger’ (>150nm) diameter collagen fibrils compared to the older rabbits, with the authors using distribution analysis to show that this difference was statistically significant. Analysis of the collagen biochemistry showed that the older rabbits demonstrated Type V collagen, which was not present at all in the younger specimens. Overall, there are significant changes between older and younger specimens, but how do these findings extrapolate to the clinical situation?
In previous studies, Type V collagen has been shown to regulate the diameter of Type I collagen. Dressler et al propose that increased Type V collagen may therefore have an adverse affect on patella tendon strength. The finding that as we age, so our tendon structure changes and loses elasticity, has good face validity. However, there are methodological issues which mean this conclusion is not so straightforward. In common with most biomechanical studies, these findings are based on an animal model and it may not be reliable to assume the same findings in human tissue. This is because tissue loading profiles and tendon function is different between species. In this study the authors acknowledge that the older rabbits were ‘retired breeders’ and the effect of multiple pregnancies may have led to hormonal changes in soft tissue, rather than the changes being age-related.
Another common problem with lab-based biomechanical studies is the method of tissue loading. In this study the tendons were mechanically gripped and pulled to failure through elongation. This does not fully replicate the in vivo stresses which, during sport, tend to be repetitive rather than maximal load to failure. The findings of this study are therefore more relevant to traumatic tendon rupture than to the development of tendonopathy due to cyclic loading.
The authors indicate that future genetic research may be able to determine the direct effect that Type V collagen has on fibril diameter and the material properties of tendon tissue.
Plantar Fascitis
Faraj and Querishe undertook a retrospective analysis of 16 patients who had undergone surgical treatment for Plantar fascitis. The patients were followed up over a period ranging from 9 to 42 months, using a questionnaire, and the findings described by the authors. All 16 patients returned their questionnaire. Patient ages ranged between 31 and 70 years, with an average age of 54.
The selection criterion for these patients is not described in great detail and the patient data is not sufficient. The patient’s symptoms had lasted between 9 months and 6 years and prior to surgery all had undergone conservative treatment, consisting of physiotherapy and corticosteroid injections, which had been deemed unsuccessful. All of the patients had x-ray evidence of a heel spur. Strictly speaking, the diagnosis could be termed Calcaneal spur, rather than Plantar fascitis, although there would undoubtedly be inflammation of the Plantar fascia in patients with a painful heel spur.
In all patients the indication for surgery had been the inability to tolerate the pain or an inability to walk or work without regular interruption due to pain. Of the 16 patients operated on, the questionnaire responses indicated that although 81% of patients reported an improvement in their condition, less than half (44%) found that their pain had disappeared completely with the surgery. Nineteen percent of patients reported no improvement following surgery.
Faraj and Querishe reported that of the 11 patients of working age, 9 were restricted at work and needed time off due to heel pain. Seven of these patients eventually resumed full time work post-operatively, but 2 had to remain off work. Two patients were able to resume work activities straight away. Seven of the 16 patients reported they could run and play sport following surgery.
The major methodological flaw becomes apparent as the reader attempts to analyse the findings. The question is “What were the patients doing for a living?” The success or failure of the surgical intervention can be seen in a very different light, depending on the physical requirements of each patient’s job. However, because the authors don’t provide sufficient information, the reader is unable to gauge just how successful the surgical procedure is. The overall impression is that the procedure improved symptoms, but rarely alleviated the pain completely. Larger scale studies, with longer term and more objective outcome measures, together with a better description of the subject group, would be helpful to aid decision making in patients with Calcaneal spurs and Plantar fascitis.
Injuries in English professional soccer
Recently published research in the British Journal of Sports Medicine has highlighted the occurrence of injuries in English professional soccer during the pre-season training period. Injury data was collected by medical staff at 91 professional soccer clubs and analysed by the full time research physiotherapists at the English Football Association. In keeping with many previous studies on soccer injury epidemiology, the researchers found that in the two years of the study, 17% of all injuries (1025 of 6030 injuries) occurred during the pre-season training; this led the authors to analyse pre-season injuries in more depth. The pre-season period in English professional football lasts roughly from early July to mid August. It is the fitness rebuilding period of training and, as such, is physically demanding. As it follows a summer lay-off, the switch from relative inactivity to demanding work may lead to injuries due to insufficient adaptation.
The data was returned via a postal questionnaire method, between the 1997-98 and 1998-99 English football seasons, with return rates of 87% and 76% respectively for each season. This represents a very good response rate for this type of study. One flaw in the study is the definition of the pre-season period. The period is not clearly defined, but the data used by the authors shows that the month of July was classified as ‘pre-season’. However, each team will have returned to training at a different date; some during the first week in July and others during the second week in July. In addition, elite players who participated in the 1998 World Cup finals may have been given permission to return to their clubs in late July. This may mean that the authors’ definition of pre-season is inappropriate. Furthermore, if the competitive season begins in the first or second week of August, then two weeks of ‘pre-season’ injury data is not classified as such, leading to an underestimation of the true injury level.
The volume of injury data collected is impressive, but the ambitious design means the size of the study leads to further methodological flaws. Firstly, the researchers are reliant on the injury recording and interpretation of the individual medical staff at each of the ninety-one participating clubs. Each of these medical staff may have a different interpretation of an injury, based on their level of training and varying professional background. For example, while many of the medical personnel at Premiership clubs are Chartered Physiotherapists with post-graduate qualifications in sports medicine, the same is often not true of those personnel working at Football League clubs, where the level of training is often limited to a four week residential course organised by the Football Association. The authors do not provide details of any reliability testing between data collectors and it appears that this problem has not been addressed.
Woods et al established that tendon related injuries were more prevalent during the pre-season period, when compared with the competitive season, with 32% of Achilles related injuries being sustained during the pre-season period. Of these, 94% were classified as either tendonitis or paratendonitis. This would suggest a very low incidence of Achilles tendonosis, contrary to recent studies on tendon dysfunction. It would appear that either English soccer players, unlike other professional athletes, are seemingly immune to Achilles tendonosis, or the diagnostic skills of the data collectors are somewhat empirical. This may be due to the varying levels of professional qualification mentioned above and, consequently, casts a major doubt on the reliability of the data presented in this study.
Another variable not addressed by the authors is the differing demands on players of different levels. For example, the preparation and playing schedule for a player at a Premiership club that also competes in the UEFA Champions League is different from a player whose team is in the lower half of the Premiership, and very different from the player who plays for a club in the English Third Division. The authors have not attempted to analyse the data separately to take this into account. Anyone who observes English soccer at its different levels will conclude that the authors are not comparing like with like. This problem is further compounded by the fact that activity and exposure data was not examined by the authors, meaning the true risk of an injury cannot be determined. Indeed, this could be the biggest flaw in this well-meaning project, as it does not allow the reader to ascertain the true injury incidence based on matches played and training hours.
Despite its poor scientific rigour, this study received a high level of media attention due to the fact that it was funded by the Professional Footballer’s Association and undertaken by the Football Association Medical Education Centre. Unfortunately, the main points disseminated by the media were, firstly, that the ground condition was dry in 70% of preseason injuries. This says more about the typical English summer (July) and nothing can be inferred from this regarding injuries. The second major point picked up by the media was that football boots provide poor support and may predispose a player to injury. What would the alternative be? To quote the authors on the role of football boots on injury, “…their design may contribute to injury…” and, incredibly, “…Footballers often purchase new boots at the start of pre-season without considering the most suitable boot for their foot type”. To think that elite level players use one pair of boots in a season demonstrates the author’s poor understanding of what goes on in a professional football club. Indeed, many elite level players wear a new pair of boots for each Premiership match.
Despite its good intentions, the methodological flaws within this study mean that it contributes little to the knowledge base on soccer injury epidemiology. Existing, more rigorous studies on the incidence of soccer injuries have already established injury patterns and linked these to specific playing activities. Perhaps future studies may have less ambitious objectives and provide more reliable data that is clinically relevant to practitioners who care for players at different levels.
Guide to Prevention, Treatment & Rehabilitation
A Sprained Ankle Injury Explained
A sprained ankle is one of the most common injuries caused by participation in sports. It refers to soft tissue damage (mainly ligaments) around the ankle, usually caused by an inversion injury (where the ankle is twisted inwards) or an eversion injury (where the ankle is twisted outwards).
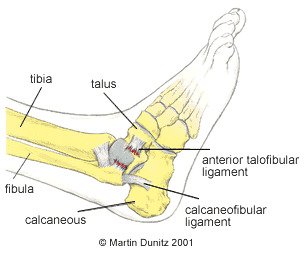
Because of the position of the bones around the ankle, the inversion injury is far more common. This injury causes damage to the lateral ligaments, and other soft tissues, on the outside of the ankle.
The most commonly injured ligament is the anterior talo fibular (ATF) ligament which, as the name suggests, joins the fibular and talus bones together. If the force to the ankle is more severe, the calcaneo fibular ligament (between the calcaneus and fibula) is also damaged. The posterior talo fibular (PTF) ligament is very rarely damaged in comparison to the other two ligaments.
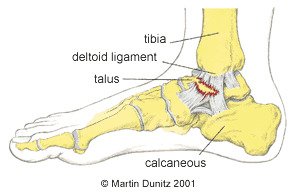
In the case of an eversion injury the damage occurs on the medial (inside) of the ankle. The ligament on the inside of the ankle is called the deltoid ligament and is very strong. It is so strong in fact that the bone on the inside of the ankle can be pulled off, in what is called an avulsion fracture, before the ligament is damaged.
As well as damage to the ligaments, the capsule which surrounds the ankle joint can also be damaged. The damage causes bleeding within the tissues and the ankle begins to swell up and can be extremely painful.
Ankle sprains can be classified as follows:
- First degree, where only a few ligament fibres are damaged
- Second degree sprain refers to more extensive damage to the ligament with associated swelling
- Third degree sprain refers to a complete rupture of the ligament with swelling and a possible joint dislocation
- In the more severe injuries there may be associated bone injury and it is wise to get an x-ray to determine whether there is a fracture.
Sprained Ankle Injury Signs & Symptoms
With a first degree sprain there is pain when turning the foot in or out and also pain when the damaged area is touched. With a second degree sprain the pain is more severe, there is swelling all around the area and it is painful to walk. With a third degree sprain the pain is excruciating and walking is impossible. There is gross swelling and there may be a great degree of joint laxity around the ankle or deformity if the ankle is dislocated.
What you can do
- Consult a sports injury expert
- Apply ice packs/cold therapy to reduce swelling
- Wear a removable plastic cast for protection
- Wear an ankle support for protection
- Wear an ankle support for protection
- Use a wobble board for ankle strengthening
Sprained Ankle Injury Treatment
In the first 48-72 hours following the injury it is important the follow the PRICE protocol – protection, rest, ice, compression and elevation (never apply ice directly to the skin). Ice packs for a period of twenty minutes every couple of hours may help with the pain and help reduce the initial inflammation, but pain-relieving medication may also be necessary. A cryotherapy cuff is the most effective method of providing ice therapy, whilst protecting the injured tissues from further damage, and is the professional’s choice. It can provide continuous ice cold water and compression for 6 hours and significantly reduce pain and swelling in the early stages of injury.
It is important not to put too much weight on the damaged ankle, so walking should be limited where possible. Ankle injuries can be protected using a plastic walker boot cast and these are regularly used by Premier League football players to dissipate weight bearing.
Where a fracture is suspected an x-ray should be carried out at an accident and emergency department. If a fracture is found or a grade three sprain is diagnosed, the advice of the attending doctor should be followed. It should be borne in mind that some hairline fractures do not show up on x-ray until about 10-14 days after the injury, so if the pain persists medical attention should be sought.
In the case of a grade two sprain, crutches should be used to protect the injured ankle. However, it is important not to be on the crutches for longer than necessary and as soon as the pain allows the patient should begin to gently put weight through the ankle by walking to maintain a normal gait pattern and prevent compensatory movements being adopted. Reusable plastic casts can be very helpful as they protect the injured area and help to resolve ankle swelling.
Ligament Damage and Repair Explained
Once the patient is able walk on the ankle, more active rehabilitation can be started.
In ankles that have been repeatedly sprained there is an inherent weakness which may require surgery. This can now be done arthroscopically where a camera is inserted into the ankle and flakes of bone and excess scar tissue can be removed. Because of the injury to vital mechanoreceptors within the ligaments and tendons around the ankle, continuing rehabilitation may be necessary for the months and years that follow an injury. This is because proprioception around the ankle can be greatly compromised with a severe injury and re-injury is often very likely.
Sprained Ankle Rehabilitation
This ankle rehabilitation programme is an example of the progression followed by a professional footballer with a sprained ankle. The principles of rehabilitation apply to all ankle sprain injuries, regardless of the sport. These principles, together with expert input from a healthcare professional can help you recover safely and quickly following a sprained ankle. The progression of the exercises should be based on pain free completion of the previous exercise. All rehabilitation exercises should be preceded by a warm up.
Stage 1: Acute Stage (days 1 to 3)
Follow the PRICE protocol:
Protection
The injured tissues should be protected from further damage. A removable plastic cast is ideal as it helps protect the joint and limit weight bearing. It provides the same protection as a plaster cast but it is lightweight and can be removed by the patient. In the case of Grade 3 ankle sprains crutches should also be used.
Rest
Rest from sports is essential, but even walking on the ankle, if it is painful, may cause further damage and should be avoided. No weight should be put through the injured ankle and crutches should be used. Pain relieving medication prescribed by a doctor may be necessary.
Ice
Ice packs are applied for periods of twenty minutes every couple of hours (never apply ice directly to the skin). The ice packs relieve pain and are thought to reduce bleeding in the damaged tissue. A cryotherapy cuff is the most effective method of providing ice therapy and is the professional’s choice. It can provide continuous ice cold water and compression for 6 hours and significantly reduce pain and swelling.
Compression
A swollen ankle is a sign of a significant ankle sprain. The swelling is caused by bleeding in the tissue and a leaking of cellular fluid secondary to tissue damage. If this swelling is allowed to consolidate it can produce excessive scar tissue and structural changes, which seriously lengthens the rehab period. Compression during the early stages helps to reduce swelling and is essential for a good outcome. Compression is provided by the use of a compression sleeve or brace with intermittent use of a cryo cuff to provide ice and compression.
Elevation
If the ankle is not elevated the effect of gravity causes the tissue fluid to accumulate at the ankle. This can cause increased tissue pressure which is extremely painful. To relieve pain and prevent excessive swelling, the ankle is elevated above waist height.
If the pain allows, the ankle should be removed from the cast and gently pumped forward and back 20 times each hour. This is done by sitting down with the leg elevated and pushing the toes forward and back. This facilitates the dispersal of swelling from the ankle.
Stage 2: Sub-Acute Stage (days 3 to 14)
The sub-acute stage begins by bearing weight on the ankle to pain tolerance. This is graduated from partial weight-bearing with a plastic cast and crutches to full weight-bearing without crutches. A normal walking pattern should be encouraged and there should be no limping.
Ice therapy can be continued so long as there is pain. Compression using the walker boot or ankle brace is continued during walking to encourage the dispersal of swelling. When possible the ankle should be elevated to allow the effect of gravity to help drain swelling away from the injury site. Gentle massage to further encourage the dispersal of swelling towards the back of the knee can also be implemented.
Ankle pumping exercises can be continued and progressed to being done in water. Exercises in water are effective because they involve only partial weight-bearing and because the hydrostatic pressure provided by the water has the effect of encouraging the swelling to disperse.
Exercises in water involve only partial weight-bearing and are effective in helping to disperse swelling.
General fitness is maintained by using a static exercise bike and resistance weight machines in a gym. Resistance Bands may also be used to start to encourage range of movement and gentle strengthening exercises. Different levels of resistance can be used so “light” bands are used at first then as pain, swelling and function all improve the level of resistance can be increased.
Stage 3: Early Rehab (week 3)
After two weeks most of the rehabilitation is achieved through active exercise, although the physiotherapist may help regain range of movement by carrying out massage and passive mobilising techniques. This involves the physio gently moving the bones of the ankle to help restore range of movement and relieve stiffness.
Exercise 1
The first exercise is to help restore the ankles’ range of movement.
Sitting on the floor, the ankle is pumped forward and back.
20 repetitions, 5 times daily.
The patient progresses to doing the same exercise while sitting on a high bench or chair, letting the feet hang down
Exercise 2
This exercise uses a resistance band to strengthen the dorsiflexor muscles that pull the toes back towards the knee.
Sitting on the floor, a resistance band is tied around the foot, with the other end attached to a fixed object in front of the foot.
Slowly the foot is pulled back towards the knee.
20 repetitions, 5 times daily.
As this becomes easier, the resistance band is changed to one that provides more resistance.
Tip: Doubling up the resistance band is an easy way to achieve more resistance.
Exercise 3
This exercise is designed to strengthen the plantar flexor muscles that push the foot down, such as when pushing the pedals of a car.
Sitting on the floor, with the legs out straight, a resistance band is tied around the foot, and the other end held in the hand. Slowly, the foot is pushed forward and then relaxed.
20 repetitions, 5 times daily.
Again, as this becomes easier, the resistance level of the resistance band should be increased.
Exercise 4
This exercise is a progression of the previous plantar flexor strengthening exercises.
The patient stands with their hands resting against a wall so that it is taking some of their body weight. With both feet, the patient pushes up on the toes so the heels rise up off the floor. This position is held for 2 seconds and then the heels are slowly lowered.
20 repetitions, 5 times daily.
Once this becomes easier, the same exercise is done but without any hands against the wall. Once this has been mastered, the patient progresses to doing the exercise with the toes positioned on a block or a step, so that the heels have to come down lower before pushing up.
The final progression to this exercise is to do it on the affected ankle alone.
Exercise 5
This exercise is designed to strengthen the Peroneal muscles that evert the foot and enable the foot to turn outwards. These muscles are also vital for proprioception when returning to sporting activities.
Standing up, the base of the foot is turned outwards, held for 2 seconds and then relaxed.
20 repetitions, 5 times daily.
Proprioception Exercises
Apart from mobilising and strengthening exercises, the rehabilitation for a sprained ankle can be greatly enhanced by practicing what are called proprioception exercises. These enhance neuromuscular control around a joint and are very important to the professional sportsperson, or anybody returning to sports where landing, twisting and turning are necessary. These exercises should be started as soon as pain allows.
The patient balances on the affected leg while partial weight-bearing. This should be done for 1 minute, followed by rest periods to avoid muscular fatigue.
Proprioception exercises can be done while partial weight-bearing first, then progressed to full weight-bearing, such as using a wobble board. The wobble board together with ankle brace are commonly used in the rehabilitation of ankle instability. Wobble boards are designed to assist the re-education of the proprioceptive system by improving sensory nerve function. Research has shown that wobble board training improves single leg stance ability and balance, while other studies have suggested that patients with ankle instability who underwent wobble board training experienced significantly fewer recurrent sprains during a follow-up period than those who did not follow the training programme.
The patient balances on the affected leg for 1 minute, followed by rest periods to avoid muscular fatigue.
Stage 4: Late Rehab (week 4)
Progressive strengthening of the muscles around the ankle should be continued, as should the proprioception exercises. To prepare for a return to functional activities the intensity of exercise should be increased. The use of an ankle brace or ankle taping can provide essential support and confidence at this stage.
Basic plyometric exercises should be commenced.
Jogging should also commence, and should be progressive as follows:
| Day 1 | Jog 100 metres, walk 50 metres, with 6 repetitions. |
| Day 2 | Jog 150 metres, walk 50 metres, with 6 repetitions. |
| Day 3 | Jog 200 metres, walk 50 metres, with 8 repetitions. |
| Day 4 | Jog 200 metres, walk 50 metres, with 12 repetitions. |
| Day 5 | Jog 2000 metres. |
Stage 5: Functional Rehab (week 5+)
The progression to functional activities can begin once the patient can jog without pain and is comfortable doing plyometric drills. The idea of this stage is to progress from gentle exercise to the high intensity at which games are played, by breaking down complex movements and strengthening all of the components. All exercises are preceded by a warm up. As each exercise is a progression they should be completed at least one day apart, under the supervision of a chartered physiotherapist.
Exercise 1
Variable pace running with the gradual introduction of turns.
This involves running round a 20m diameter figure-of-eight course. The figure-of-eight course puts very gentle stress on the ankle and prepares the player for later turning drills. The pace is limited to walk, jog or half pace running and is determined by the physiotherapist who shouts out the desired pace. The physiotherapist also shouts the commands stop and start. This re-introduces the player to the variable demands of a game of football and the Physiotherapist can observe for any compensatory movements that may have resulted from the injury and if not addressed could cause future injuries when returning to activity.
The session should last about 25 minutes.
Exercise 2
Variable pace running with gradual turns and various starting positions.
The player starts at one end of the course and makes a 30m run up to a 20m diameter semicircle, around which they gently turn before completing another straight 30m run back to the finish. The pace of the run is dictated by the physiotherapist and is either a jog or half pace. The starting position should be different for each run (standing, lying on back, lying on front, sprint start position, squatting, right side lying, left side lying, jumping, hopping, facing backwards).
The patient should aim to complete 20 runs.
Exercise 3
A progression of exercise 1 – variable pace running with slightly tighter turns.
Run round a 10m diameter figure-of-eight course. The figure-of-eight course puts stress on the ankle and prepares the player for later turning drills. The paces used are walking, jogging, half pace running, and three-quarter pace running, as determined by the physiotherapist who shouts out the desired pace. The physiotherapist also shouts the commands stop and start.
The session should last about 25 minutes.
Exercise 4
A progression of exercise 2 – variable pace running with gradual turns and various starting positions.
The player starts at one end of the course and makes a 30m run up to a 20m diameter semicircle, around which they gently turn before completing another straight 30m run back to the finish. The pace of the run is either three-quarter or full pace, as dictated by the physiotherapist. The starting position should be different for each run (standing, lying on back, lying on front, sprint start position, squatting, right side lying, left side lying, jumping, hopping, facing backwards).
The player should aim to complete 20 runs
Exercise 5
Two 5m diameter circles are placed 30m apart. Travelling at full pace the player makes a run, with a football at the feet, goes around the far circle and then back to the finish.
This should be repeated 20 times.
Exercise 6
As exercise 5, but single cones are used instead of 5m diameter circles.
Exercise 7
Six cones are placed 5m apart in a straight line. The player completes a shuttle run, at full pace, turning alternately to the left and right.
This should be repeated 10 times
Before a gradual return to full training is considered, the patient should be happy with all normal ball work drills, all types of passing. For instance in football; instep, side foot, front foot, outside of foot, side foot volley, laces volley, half volley, over all distances, heading, jumping and heading, and tackling.
Sprained Ankle Injury Prevention
Ankle instability is characterised by ankle weakness and giving way, even though the ankle ligaments are intact and the joint is mechanically stable. It is due to an impairment of proprioception, which leads to a lack of balance and ankle joint position sense. Proprioception is the mechanism by which nerve receptors in skin, muscle, ligament and joint tissue relay information to the brain about body position sense, where this information is quickly processed and movement strategies are formulated and executed using nerve signals to muscles. This mechanism can help you ‘catch yourself’ when you are about to turn your ankle.
In the unstable ankle these receptors may have been damaged directly during an ankle sprain. The Peroneal muscles and tendons that run along the outside of the shin and are often involved in ankle inversion injuries are particularly rich in receptors. This impaired proprioceptive ability may, therefore, lead to a delay in protective muscle activity and the resultant loss of postural awareness and stability around a joint. This may explain why recurrent ankle sprains are so common.
Wobble Boards together with ankle braces are commonly used in the rehabilitation of ankle instability. Wobble boards are designed to assist the re-education of the proprioceptive system by improving sensory receptor function. Previous research has also shown that wobble board training improves single leg stance ability and balance; while other studies have suggested that patients with ankle instability who underwent wobble board training experienced significantly fewer recurrent sprains during a follow-up period than those who did not follow the training programme. Exercise bands are also useful to help restore muscle strength, especially in multi-directional planes of movement improving the strength and protection around the ankle.
Taping and bracing the ankle can also help to reduce recurrent ankle injury. Previous research has shown the injury incidence in students with taped ankles was 4.9 ankle sprains per 1000 participant games, compared with 2.6 ankle sprains per 1000 participant games in students wearing ankle braces. This compared with 32.8 ankle sprains per 1000 participant games in subjects that had no taping or bracing.
Complete Guide to Hip Arthritis (Osteoarthritis)
What is Hip Arthritis?
Hip arthritis (osteoarthritis) is a common cause of hip pain and hip stiffness that usually manifests itself in middle age. The term osteoarthritis is somewhat misleading, because its literal meaning is ‘joint inflammation’. Although there is a component of joint inflammation with this condition, the primary pathological process is progressive hip joint degeneration. In order to fully understand arthritis of the hip, it is probably helpful to review the anatomy of the hip joint.
The hip is a ‘synovial ball and socket joint’. This means that the ball of the femur and the socket of the pelvis that make up the hip joint are enclosed by a synovial capsule which contains synovial fluid. Synovial fluid lubricates the joint and provides nutrients to the tissues of the joint.
The joint surfaces of the ball and the socket are covered by hyaline cartilage, which provides friction free movement. There is a circular structure around the rim of the socket, called the acetabular labrum. The acetabular labrum is a shock absorber that is made of fibrocartilage. Damage to the labrum during sports can predispose someone to later arthritis of the hip. Both the ball (femur) and socket (pelvis) can be affected by arthritis.
Damage to the hyaline cartilage joint surfaces can be as a result of sporting trauma, but is more commonly due to repetitive stresses over a long period of time. Because the hip is an essential joint in weight-bearing, this is usually associated with habitual overuse of a joint for sporting but also occupational purposes, such as prolonged standing and walking. In most individuals, the signs and symptoms do not appear until middle age, but the disease process starts much earlier and the arthritis process can be accelerated following trauma to the hip joint.
The hyaline cartilage is normally ultra smooth to allow friction free movement, but early damage to the superficial layers produces a frayed appearance. In time, with more stress, this frayed surface evolves into cracks or ‘fissures’ in the articular cartilage, which can leave the underlying bone exposed to the point that there is bone on bone contact.
With continued wear the underlying bone takes on a polished appearance and eventually micro-fractures appear. The body’s natural reaction is to attempt to heal the micro-fractures by laying down more bone. This leads to a thickening of the underlying layer of bone, which can be seen on x-ray. Another common feature on x-ray is the formation of bone cysts in the layer of bone beneath the joint surface, together with a flattening of the joint surfaces as the body attempts to spread the surface area over which forces are transmitted.
As well as changes in the Hyaline cartilage and underlying bone, osteoarthritis produces soft tissue changes. As the joint becomes deformed by bony changes the ligaments which support the joint become stretched. There is also thickening and distension of the capsule that surrounds the joint and both of these features get progressively worse and can restrict movement at the joint.
Signs & Symptoms of Hip Arthritis
Hip pain is the most universal symptom of hip arthritis. This hip pain can be felt around the groin, but may also radiate down the thigh or up to the back. As the arthritis worsens and muscle wasting occurs there is often a pronounced limp. Weakness of the gluteal muscles means that the affected hip ‘drops’ during each walking step. This is known as a trendelenburg gait. The diagnosis of hip arthritis is confirmed with an x-ray which is characterised by a loss of joint space between the two bones.
Although osteoarthritis is a progressive disease, the signs and symptoms of the condition rarely get worse in a linear fashion. Often people in their thirties or forties will ‘overdo it’ one weekend, either in sport or in the garden, and they will experience a flare up from the degenerate joint. This flare up may last for 48 hours and usually consists of stiffness (particularly in the morning), pain and swelling of the affected joint.
Flare ups will settle with rest and the use of NSAIDs prescribed by a doctor. Ice therapy can also be helpful to relieve pain and reduce inflammation within the tissue. Ice packs can be applied for periods of twenty minutes every couple of hours (never apply ice directly to the skin as it can cause an ice burn).
A substantial time period may pass before there is another flare up, but each flare up will get progressively more intense. Also as time goes by and more stress is put on the affected joint, the time interval between flare ups will decrease to the point where, eventually, the person will have pain even at rest.
As the disease progresses the symptoms that start off being triggered by over activity, become triggered by immobility. Whereas, in the early stages, rest is essential during a flare up period, disuse in the later stages will exacerbate the problem. Evidence now suggests that gentle movement and exercise is beneficial for symptoms of osteoarthritis. This is because the dynamic stability provided by the muscles surrounding the joint is lost if there is muscle wasting due to inactivity. This puts even more strain on the ligaments and ultimately the joint surfaces themselves – producing more pain. In the later stages, if there is pain at rest and during the night, as well as problems with mobility, then joint replacement surgery is appropriate.
Treatment of Hip Arthritis
What you can do
- Consult a sports injury expert
- Use a buoyancy belt for mobilisation exercises in a swimming pool
- Use resistance bands for muscle strengthening exercises
- Wear compression shorts for reassurance following surgery
Patient education is one of the most effective treatment strategies. By understanding the nature of osteoarthritis the patient can make adjustments to their lifestyle that will make the problem more manageable. In summary, the patient must understand that too much activity or too little activity will make the problem worse. Maintaining a manageable level of low impact exercise such as walking is now thought to be extremely beneficial, even when osteoarthritis affects weight-bearing joints such as the hip. Each individual is different but, over time and through experience, each person will learn the optimum level of activity for their affected joint.
During the early phase, flare ups are best treated symptomatically. NSAIDs prescribed by a doctor are effective in relieving pain. Anti inflammatory gel can also help and doesn’t have the side effects associated with anti inflammatory tablets. An ice pack may be used to relieve a hot painful hip joint. Ice packs can be applied for periods of twenty minutes every couple of hours (never apply ice directly to the skin as it can cause an ice burn).
Many people find that wearing compression shorts can help provide support and reassurance. As Arthritis of the Hip tends to be more painful during cold winter months, compression garments and base layers are often helpful as it provides soothing warmth to the joint.
Once arthritis of the hip has been formally diagnosed a more long term preventative strategy can be undertaken. This is aimed at reducing pain and stiffness and maintaining range of movement in the affected joint. A sensible approach can prevent excessive degeneration which may eventually lead to disability.
Each individual case is different and a full assessment by a chartered physiotherapist will identify factors that may exacerbate the problem. Once identified, the physiotherapist will formulate a strategy to address these problems and an exercise regime can be developed. It may be that a work task is putting excessive repetitive stress on the affected joint. It may be possible to modify the task so it can be done in a different position, or specially adapted equipment can be used to reduce the repetitive loads. The main problem may be due to posture or a mal-alignment of the body.
Where the hip joint is affected maintenance of full range of motion is encouraged to reduce stiffness and loss of movement. Hip movement can be lost if the person doesn’t use the full range of motion because of pain and a characteristic, sequential loss of movement occurs. A physiotherapist can use manual techniques to help maintain the range of movement.
Pain in the hip joint can lead to an inhibition of the gluteal muscles. This leads to a vicious circle of further joint instability and more pain, leading to more inhibition and muscle weakness. Exercises using resistance bands to maintain gluteal muscle strength are encouraged to provide support for the affected joint. This strengthening should be done under the supervision of a physiotherapist.
If the hip joint is affected then weight bearing activities can make the problem worse. Running on a hard surface increases the stress on the joints and is not helpful for a person with osteoarthritis, even with shock absorbing insoles.
Swimming, because of its non weight bearing nature, is much more beneficial for the person with osteoarthritis of the hip. During this time hip function can be enhanced by performing non weight bearing exercises in the pool. A buoyancy belt allows an early return to swimming pool exercises for people with arthritis of the hip. It clips around the waist and allows the user to exercise without putting weight through their injury.
Where hip pain due to hip arthritis significantly reduces quality of life, then hip replacement surgery should be considered. It is an extremely successful operation in the vast majority of cases, leading to a dramatic restoration of function. However, despite many technical advances in replacement hip joint design, the new joint has a limited life span. Surgeons therefore prefer not to undertake hip replacement surgery in younger patients who have hip arthritis. Alternative surgical techniques such as hip joint re-surfacing may be more appropriate in younger patients. Hip re-surfacing involves placing a metal cup in the hip socket and a metal cap over the ball of the joint.
Prevention of Hip Arthritis
In addition to avoiding weight bearing and impact exercises, prolonged sitting should be avoided, as should sitting in one position for a period of time. Frequent breaks should be taken to stretch and take the hip joint through it’s full range of motion, as the articular cartilage draws most of it’s nourishment from the synovial fluid within the joint, and this has the effect of providing nutrients to the joint surfaces. Prolonged sitting will also prevent the gluteal muscles from working efficiently so regular breaks will help restore their function isn’t compromised.
Insoles
Full Length Insoles
Our Full-Length insoles incorporate the latest orthidic technology and are the perfect solution to your everyday demands. Our insoles feature a number of different features and benefits such as preventing sports injuries and assisting you during rehabilitation for a number of conditions, such as: Fallen Arches, Shin Splints, Pronated Foot, Plantar Fasciitis, Achilles Tendonitis, Runners Knee, Osteoarthritis of the hip joint and knee joint, Tibial Stress Fractures, Blister Prevention, Foot and Back Pain.
The position of the foot is hugely important in the biomechanics of the whole lower limb and beyond. If the arch has fallen it can lead to knee, hip, back or other pains that spiral up the body. Like a house, the foundations need to be strong. By using an insole it can help reduce excess strain to joints up the kinetic chain that may result from a malalignment of the foot.
Plantar fasciitis insoles and arch support insoles relieve and redistribute the pressure caused by fallen arches or flat feet. Orthotic insoles are designed to relieve plantar fasciitis pain and help you feel more comfortable when walking or moving around.
Sports Insoles
When you’re participating in sports, be it football, cycling, running or tennis, insoles are a great way to support your feet and prevent any foot conditions developing due to ill-fitting boots or sports trainers. They can also help manage any existing conditions such as shin splints, plantar fasciitis and many more. Our selection of Sports Insoles are a great way to find the support you need while out on the court, field or track. Many injuries can stem from malalignment of the foot and cause the knee, hip or back to take more strain as the impact is felt further up the kinetic chain. Improving the foot posture can help relieve overload of the mentioned joints and soft tissues that can overcompensate for faulty foot mechanics.
Our shock-absorbing sports insoles have energy dispersion systems that allow the insoles to absorb the shock and impact on the heel and forefoot during the landing phase of each and every motion. Designed to reduce fatigue, improve athletic performance as well as ensure that pressure on the ankle, knee and hip is reduced, the is a must for athletes and sport enthusiasts.
We also have arch support insoles that offer support and stability to those with a medium or high arch. Like a fallen arch, an arch that is high can also cause excess strain to the muscles surrounding the foot such as the Plantar Fascia and the Gastrocnemius and Soleus complex. These insoles for high arches and sports shoe inserts have been moulded from a long-lasting, durable polyurethane foam for structural support which help to maintain superior shock-absorbing benefits. This provides increased comfort and helps to reduce injury incidence rates.
Many problems arise from fallen arches of the foot, if the foundations of the body are not positioned efficiently it can lead to pain and injuries further up the chain for example; knee, hip or back injuries. Insoles can help support the foot and ease aches and pains that may result from fallen arches. Prolonged walking or standing can lead to flattening of the arches and insoles can help in everyday work shoes to alleviate pain and discomfort.
PU gel foam insoles provide superb cushioning and excellent thermal insulation. Comfortable to wear the gel insoles are breathable, wick moisture away from the skin and absorb odour, making them ideal for walking, hiking and athletics.
When you’re participating in sports, be it football, cycling, running or tennis, insoles are a great way to support your feet and prevent any foot conditions developing due to ill-fitting boots or sports trainers. They can also help manage any existing conditions such as shin splints, plantar fasciitis and many more.
Gel Insoles
Our range of Gel Insoles significantly increase your comfort levels by incorporating layers of soft gel to maximize shock absorption and ease the tension on the ball of the foot and heel area, which can often become painful with excessive standing or walking. Any sports that require running, jumping and changing direction can increase the impact that goes through the body with each step and place the body at greater risk of injury.
Our gel insoles work by absorbing shock and impact in the forefoot and heel, while helping to stabilise and support the feet. They help reduce fatigue, improve athletic performance as well as ensure that pressure on the ankle, knee and hip is reduced. These performance gel insoles feature a heel cup and arch support for maximum comfort and protection.
Shock Absorbing Insoles
Our range of Shock Absorbing Insoles are a great way to lessen the impact on your feet, be it in every day life or during sporting activities. Our shock-absorbing insoles absorb the shock and impact on the heel and forefoot during the landing phase of any motion.
TPE Gel Insoles trap shock waves at their source to cushion the foot from impact like no other insole. Providing optimum comfort whether walking, hiking or running, the durable gel insoles feature a contoured design and sleek fit. We also have durable gel foam insoles with a massaging wave system; The grooves in the gel act like tiny springs to absorb impact on pressure points in the heel and the ball of the foot. Designed to provide additional cushioning and stability, the gel insoles support the arch of the foot for maximum comfort.
3/4 Length Insoles
Our Three Quarter Length shock absorbing insoles and gel insoles are excellent for all day comfort in work shoes, and for the prevention and treatment of sports injuries typically suffered by runners, dancers, tennis players and other sportsmen and women.
¾ length insoles can still provide firm arch support to the foot and help with flat, low or fallen arches. Orthotic arch supports reduce pronation and supination for improved stability. Comfort 3/4 length insoles are perfect for everyday use in tighter fitting shoes where additional material in the toe box becomes too tight. Each insole sticks to the shoe and can easily be removed and transferred to another pair of shoes.
Football boot insoles and sensitivity to extent of ankle inversion movement
Waddington and Adams, of the School of Physiotherapy at the University of Sydney, have investigated the effect of football boot insoles in relation to ‘ankle movement discrimination’ (the ability to move the ankle appropriately for the required conditions), in the Australian Women’s soccer team. Using an automated testing device, the authors concluded that sensory input was impaired when the players wore football boots compared to when they were barefoot, but that this sensory input could be enhanced if the players used textured insoles.
As increased ‘ankle movement discrimination’ is an attribute that may help to prevent ankle sprain injury. The authors suggested that textured insoles in boots and sports shoes could prevent the all too common foot and ankle injuries that plague athletes. While conventional boots and sports shoes, with a smooth insole, appear to mask vital sensory cues to the extremely sensitive soles of the feet, the use of textured insoles may enhance this relay of the proprioceptive system.
The authors claim that the inclusion of air cushions or gel cells in boots and trainers to absorb shock, only serves to make matters worse but, as this study didn’t examine this variable, this is merely conjecture. Although limited by a small sample size, the findings of this study may indicate that textured insoles have a role to play in the prevention of ankle injuries. Perhaps with more widespread use of textured insoles, more epidemiological evidence may emerge to provide stronger evidence on the effectiveness of this strategy in injury prevention.
Orthopaedics and Rehabilitation
A group of researchers from the Department of Orthopaedics and Rehabilitation at Walter Reed Army Medical Center, Washington DC have undertaken a study looking at the effect of drain use in the early post-operative period following ACL reconstruction. It is an interesting topic and a valuable piece of work, as there is very little published research in this area.
Previous research found that 51% of sports medicine fellowship directors routinely used post-operative drains after ACL reconstruction. This was a North American study and it must be said that the practice of using a drain following ACL reconstruction is very much more common in the United States than in the UK. The theory behind using a drain is based on removing serous fluids and blood from the operated joint with the aim of allowing greater range of movement and reducing scar formation and adhesions. However, previous orthopaedic research has shown no benefit of drain placement, with many studies reporting increased complication rates associated with post-operative drain usage, most notably post-operative infection.
The authors undertook a prospective randomized blinded evaluation on the effect of drain use in the early post-operative period after arthroscopically assisted ACL reconstruction with bone-patellar tendon-bone graft in 21 patients. The treatment group consisted of 12 patients, and 9 were in the control group. The drain was removed from the treatment group 24 hours after the operation, as is standard practice. Four outcome measures (pain, knee flexion, knee extension and suprapatellar girth) were examined over the first seven post-operative days.
Pain scores on a visual analogue scale demonstrated the same improving trend over time for both the treatment and control groups; however, the treatment group had significantly higher average pain scores, except on day 7. The authors acknowledged that pain management may have been a confounding variable affecting the outcome of pain scores, since they did not track the volume or frequency of drug use to control pain.
What’s more, comparing average pain scores between two groups is a contentious method as pain is highly subjective. In measuring pain, researchers are as much assessing the pain tolerance of the subjects as they are assessing the pain involved in the two methods. Averaging out the group scores will have the effect of attenuating any true differences, especially given the small sample size. From a methodological point of view, to truly assess the differences in pain between the two methods the same person would have to have two surgical procedures on the same knee, one with and one without a drain – then the pain scores could be compared. Obviously this is impractical in most cases. Perhaps it could be assessed in athletes who have repeat surgical procedures throughout their career.
Differences in the objective data – suprapatellar girth, flexion and extension – were not found to be statistically significant between groups. There is some ambiguity in the knee extension data – it was not clear if the degrees of extension represented hyperextension, or more likely degrees of extension lacking, in which case the data should have been presented as negative numbers.
The authors concluded that the use of a drain after arthroscopically assisted anterior cruciate ligament reconstruction provided no benefit in terms of range of motion, effusion, or pain in the early post-operative period. This fits with general clinical findings where, whether or not drains are used, knee swelling resolves and the patient makes a good recovery in most cases. Given the negligible value of the use of a drain in the first seven post-operative days, and the potential disaster of knee infection associated with its use, it is clear why so many surgeons prefer not to use this technique. Advocates of drain use may argue that other variables, such as knee joint adhesions, observed at long term follow up, may be more relevant variables to examine.
Guide to Prevention, Treatment & Rehabilitation of a Sprained Ankle
A Sprained Ankle Injury Explained
A sprained ankle is one of the most common injuries caused by participation in sports. It refers to soft tissue damage (mainly ligaments) around the ankle, usually caused by an inversion injury (where the ankle is twisted inwards) or an eversion injury (where the ankle is twisted outwards).
Because of the position of the bones around the ankle, the inversion injury is far more common. This injury causes damage to the lateral ligaments, and other soft tissues, on the outside of the ankle.
The most commonly injured ligament is the anterior talo fibular (ATF) ligament which, as the name suggests, joins the fibular and talus bones together. If the force to the ankle is more severe, the calcaneo fibular ligament (between the calcaneus and fibula) is also damaged. The posterior talo fibular (PTF) ligament is very rarely damaged in comparison to the other two ligaments.
In the case of an eversion injury the damage occurs on the medial (inside) of the ankle. The ligament on the inside of the ankle is called the deltoid ligament and is very strong. It is so strong in fact that the bone on the inside of the ankle can be pulled off, in what is called an avulsion fracture, before the ligament is damaged.
As well as damage to the ligaments, the capsule which surrounds the ankle joint can also be damaged. The damage causes bleeding within the tissues and the ankle begins to swell up and can be extremely painful.
Ankle sprains can be classified as follows:
- First degree, where only a few ligament fibres are damaged
- Second degree sprain refers to more extensive damage to the ligament with associated swelling
- Third degree sprain refers to a complete rupture of the ligament with swelling and a possible joint dislocation
- In the more severe injuries there may be associated bone injury and it is wise to get an x-ray to determine whether there is a fracture.
Sprained Ankle Injury Signs & Symptoms
With a first degree sprain there is pain when turning the foot in or out and also pain when the damaged area is touched. With a second degree sprain the pain is more severe, there is swelling all around the area and it is painful to walk. With a third degree sprain the pain is excruciating and walking is impossible. There is gross swelling and there may be a great degree of joint laxity around the ankle or deformity if the ankle is dislocated.
What you can do
- Consult a sports injury expert
- Apply ice packs/cold therapy to reduce swelling
- Wear a removable plastic cast for protection
- Wear an ankle support for protection
- Wear an ankle support for protection
- Use a wobble board for ankle strengthening
Sprained Ankle Injury Treatment
In the first 48-72 hours following the injury it is important the follow the PRICE protocol – protection, rest, ice, compression and elevation (never apply ice directly to the skin). Ice packs for a period of twenty minutes every couple of hours may help with the pain and help reduce the initial inflammation, but pain-relieving medication may also be necessary. A cryotherapy cuff is the most effective method of providing ice therapy, whilst protecting the injured tissues from further damage, and is the professional’s choice. It can provide continuous ice cold water and compression for 6 hours and significantly reduce pain and swelling in the early stages of injury.
It is important not to put too much weight on the damaged ankle, so walking should be limited where possible. Ankle injuries can be protected using a plastic walker boot cast and these are regularly used by Premier League football players to dissipate weight bearing.
Where a fracture is suspected an x-ray should be carried out at an accident and emergency department. If a fracture is found or a grade three sprain is diagnosed, the advice of the attending doctor should be followed. It should be borne in mind that some hairline fractures do not show up on x-ray until about 10-14 days after the injury, so if the pain persists medical attention should be sought.
In the case of a grade two sprain, crutches should be used to protect the injured ankle. However, it is important not to be on the crutches for longer than necessary and as soon as the pain allows the patient should begin to gently put weight through the ankle by walking to maintain a normal gait pattern and prevent compensatory movements being adopted. Reusable plastic casts can be very helpful as they protect the injured area and help to resolve ankle swelling.
Ligament Damage and Repair Explained
Once the patient is able walk on the ankle, more active rehabilitation can be started.
In ankles that have been repeatedly sprained there is an inherent weakness which may require surgery. This can now be done arthroscopically where a camera is inserted into the ankle and flakes of bone and excess scar tissue can be removed. Because of the injury to vital mechanoreceptors within the ligaments and tendons around the ankle, continuing rehabilitation may be necessary for the months and years that follow an injury. This is because proprioception around the ankle can be greatly compromised with a severe injury and re-injury is often very likely.
Sprained Ankle Rehabilitation
This ankle rehabilitation programme is an example of the progression followed by a professional footballer with a sprained ankle. The principles of rehabilitation apply to all ankle sprain injuries, regardless of the sport. These principles, together with expert input from a healthcare professional can help you recover safely and quickly following a sprained ankle. The progression of the exercises should be based on pain free completion of the previous exercise. All rehabilitation exercises should be preceded by a warm up.
Stage 1: Acute Stage (days 1 to 3)
Follow the PRICE protocol:
Protection
The injured tissues should be protected from further damage. A removable plastic cast is ideal as it helps protect the joint and limit weight bearing. It provides the same protection as a plaster cast but it is lightweight and can be removed by the patient. In the case of Grade 3 ankle sprains crutches should also be used.
Rest
Rest from sports is essential, but even walking on the ankle, if it is painful, may cause further damage and should be avoided. No weight should be put through the injured ankle and crutches should be used. Pain relieving medication prescribed by a doctor may be necessary.
Ice
Ice packs are applied for periods of twenty minutes every couple of hours (never apply ice directly to the skin). The ice packs relieve pain and are thought to reduce bleeding in the damaged tissue. A cryotherapy cuff is the most effective method of providing ice therapy and is the professional’s choice. It can provide continuous ice cold water and compression for 6 hours and significantly reduce pain and swelling.
Compression
A swollen ankle is a sign of a significant ankle sprain. The swelling is caused by bleeding in the tissue and a leaking of cellular fluid secondary to tissue damage. If this swelling is allowed to consolidate it can produce excessive scar tissue and structural changes, which seriously lengthens the rehab period. Compression during the early stages helps to reduce swelling and is essential for a good outcome. Compression is provided by the use of a compression sleeve or brace with intermittent use of a cryo cuff to provide ice and compression.
Elevation
If the ankle is not elevated the effect of gravity causes the tissue fluid to accumulate at the ankle. This can cause increased tissue pressure which is extremely painful. To relieve pain and prevent excessive swelling, the ankle is elevated above waist height.
If the pain allows, the ankle should be removed from the cast and gently pumped forward and back 20 times each hour. This is done by sitting down with the leg elevated and pushing the toes forward and back. This facilitates the dispersal of swelling from the ankle.
Stage 2: Sub-Acute Stage (days 3 to 14)
The sub-acute stage begins by bearing weight on the ankle to pain tolerance. This is graduated from partial weight-bearing with a plastic cast and crutches to full weight-bearing without crutches. A normal walking pattern should be encouraged and there should be no limping.
Ice therapy can be continued so long as there is pain. Compression using the walker boot or ankle brace is continued during walking to encourage the dispersal of swelling. When possible the ankle should be elevated to allow the effect of gravity to help drain swelling away from the injury site. Gentle massage to further encourage the dispersal of swelling towards the back of the knee can also be implemented.
Ankle pumping exercises can be continued and progressed to being done in water. Exercises in water are effective because they involve only partial weight-bearing and because the hydrostatic pressure provided by the water has the effect of encouraging the swelling to disperse.
Exercises in water involve only partial weight-bearing and are effective in helping to disperse swelling.
General fitness is maintained by using a static exercise bike and resistance weight machines in a gym. Resistance Bands may also be used to start to encourage range of movement and gentle strengthening exercises. Different levels of resistance can be used so “light” bands are used at first then as pain, swelling and function all improve the level of resistance can be increased.
Stage 3: Early Rehab (week 3)
After two weeks most of the rehabilitation is achieved through active exercise, although the physiotherapist may help regain range of movement by carrying out massage and passive mobilising techniques. This involves the physio gently moving the bones of the ankle to help restore range of movement and relieve stiffness.
Exercise 1
The first exercise is to help restore the ankles’ range of movement.
Sitting on the floor, the ankle is pumped forward and back.
20 repetitions, 5 times daily.
The patient progresses to doing the same exercise while sitting on a high bench or chair, letting the feet hang down
Exercise 2
This exercise uses a resistance band to strengthen the dorsiflexor muscles that pull the toes back towards the knee.
Sitting on the floor, a resistance band is tied around the foot, with the other end attached to a fixed object in front of the foot.
Slowly the foot is pulled back towards the knee.
20 repetitions, 5 times daily.
As this becomes easier, the resistance band is changed to one that provides more resistance.
Tip: Doubling up the resistance band is an easy way to achieve more resistance.
Exercise 3
This exercise is designed to strengthen the plantar flexor muscles that push the foot down, such as when pushing the pedals of a car.
Sitting on the floor, with the legs out straight, a resistance band is tied around the foot, and the other end held in the hand. Slowly, the foot is pushed forward and then relaxed.
20 repetitions, 5 times daily.
Again, as this becomes easier, the resistance level of the resistance band should be increased.
Exercise 4
This exercise is a progression of the previous plantar flexor strengthening exercises.
The patient stands with their hands resting against a wall so that it is taking some of their body weight. With both feet, the patient pushes up on the toes so the heels rise up off the floor. This position is held for 2 seconds and then the heels are slowly lowered.
20 repetitions, 5 times daily.
Once this becomes easier, the same exercise is done but without any hands against the wall. Once this has been mastered, the patient progresses to doing the exercise with the toes positioned on a block or a step, so that the heels have to come down lower before pushing up.
The final progression to this exercise is to do it on the affected ankle alone.
Exercise 5
This exercise is designed to strengthen the Peroneal muscles that evert the foot and enable the foot to turn outwards. These muscles are also vital for proprioception when returning to sporting activities.
Standing up, the base of the foot is turned outwards, held for 2 seconds and then relaxed.
20 repetitions, 5 times daily.
Proprioception Exercises
Apart from mobilising and strengthening exercises, the rehabilitation for a sprained ankle can be greatly enhanced by practicing what are called proprioception exercises. These enhance neuromuscular control around a joint and are very important to the professional sportsperson, or anybody returning to sports where landing, twisting and turning are necessary. These exercises should be started as soon as pain allows.
The patient balances on the affected leg while partial weight-bearing. This should be done for 1 minute, followed by rest periods to avoid muscular fatigue.
Proprioception exercises can be done while partial weight-bearing first, then progressed to full weight-bearing, such as using a wobble board. The wobble board together with ankle brace are commonly used in the rehabilitation of ankle instability. Wobble boards are designed to assist the re-education of the proprioceptive system by improving sensory nerve function. Research has shown that wobble board training improves single leg stance ability and balance, while other studies have suggested that patients with ankle instability who underwent wobble board training experienced significantly fewer recurrent sprains during a follow-up period than those who did not follow the training programme.
The patient balances on the affected leg for 1 minute, followed by rest periods to avoid muscular fatigue.
Stage 4: Late Rehab (week 4)
Progressive strengthening of the muscles around the ankle should be continued, as should the proprioception exercises. To prepare for a return to functional activities the intensity of exercise should be increased. The use of an ankle brace or ankle taping can provide essential support and confidence at this stage.
Basic plyometric exercises should be commenced.
Jogging should also commence, and should be progressive as follows:
| Day 1 | Jog 100 metres, walk 50 metres, with 6 repetitions. |
| Day 2 | Jog 150 metres, walk 50 metres, with 6 repetitions. |
| Day 3 | Jog 200 metres, walk 50 metres, with 8 repetitions. |
| Day 4 | Jog 200 metres, walk 50 metres, with 12 repetitions. |
| Day 5 | Jog 2000 metres. |
Stage 5: Functional Rehab (week 5+)
The progression to functional activities can begin once the patient can jog without pain and is comfortable doing plyometric drills. The idea of this stage is to progress from gentle exercise to the high intensity at which games are played, by breaking down complex movements and strengthening all of the components. All exercises are preceded by a warm up. As each exercise is a progression they should be completed at least one day apart, under the supervision of a chartered physiotherapist.
Exercise 1
Variable pace running with the gradual introduction of turns.
This involves running round a 20m diameter figure-of-eight course. The figure-of-eight course puts very gentle stress on the ankle and prepares the player for later turning drills. The pace is limited to walk, jog or half pace running and is determined by the physiotherapist who shouts out the desired pace. The physiotherapist also shouts the commands stop and start. This re-introduces the player to the variable demands of a game of football and the Physiotherapist can observe for any compensatory movements that may have resulted from the injury and if not addressed could cause future injuries when returning to activity.
The session should last about 25 minutes.
Exercise 2
Variable pace running with gradual turns and various starting positions.
The player starts at one end of the course and makes a 30m run up to a 20m diameter semicircle, around which they gently turn before completing another straight 30m run back to the finish. The pace of the run is dictated by the physiotherapist and is either a jog or half pace. The starting position should be different for each run (standing, lying on back, lying on front, sprint start position, squatting, right side lying, left side lying, jumping, hopping, facing backwards).
The patient should aim to complete 20 runs.
Exercise 3
A progression of exercise 1 – variable pace running with slightly tighter turns.
Run round a 10m diameter figure-of-eight course. The figure-of-eight course puts stress on the ankle and prepares the player for later turning drills. The paces used are walking, jogging, half pace running, and three-quarter pace running, as determined by the physiotherapist who shouts out the desired pace. The physiotherapist also shouts the commands stop and start.
The session should last about 25 minutes.
Exercise 4
A progression of exercise 2 – variable pace running with gradual turns and various starting positions.
The player starts at one end of the course and makes a 30m run up to a 20m diameter semicircle, around which they gently turn before completing another straight 30m run back to the finish. The pace of the run is either three-quarter or full pace, as dictated by the physiotherapist. The starting position should be different for each run (standing, lying on back, lying on front, sprint start position, squatting, right side lying, left side lying, jumping, hopping, facing backwards).
The player should aim to complete 20 runs
Exercise 5
Two 5m diameter circles are placed 30m apart. Travelling at full pace the player makes a run, with a football at the feet, goes around the far circle and then back to the finish.
This should be repeated 20 times.
Exercise 6
As exercise 5, but single cones are used instead of 5m diameter circles.
Exercise 7
Six cones are placed 5m apart in a straight line. The player completes a shuttle run, at full pace, turning alternately to the left and right.
This should be repeated 10 times
Before a gradual return to full training is considered, the patient should be happy with all normal ball work drills, all types of passing. For instance in football; instep, side foot, front foot, outside of foot, side foot volley, laces volley, half volley, over all distances, heading, jumping and heading, and tackling.
Sprained Ankle Injury Prevention
Ankle instability is characterised by ankle weakness and giving way, even though the ankle ligaments are intact and the joint is mechanically stable. It is due to an impairment of proprioception, which leads to a lack of balance and ankle joint position sense. Proprioception is the mechanism by which nerve receptors in skin, muscle, ligament and joint tissue relay information to the brain about body position sense, where this information is quickly processed and movement strategies are formulated and executed using nerve signals to muscles. This mechanism can help you ‘catch yourself’ when you are about to turn your ankle.
In the unstable ankle these receptors may have been damaged directly during an ankle sprain. The Peroneal muscles and tendons that run along the outside of the shin and are often involved in ankle inversion injuries are particularly rich in receptors. This impaired proprioceptive ability may, therefore, lead to a delay in protective muscle activity and the resultant loss of postural awareness and stability around a joint. This may explain why recurrent ankle sprains are so common.
Wobble Boards together with ankle braces are commonly used in the rehabilitation of ankle instability. Wobble boards are designed to assist the re-education of the proprioceptive system by improving sensory receptor function. Previous research has also shown that wobble board training improves single leg stance ability and balance; while other studies have suggested that patients with ankle instability who underwent wobble board training experienced significantly fewer recurrent sprains during a follow-up period than those who did not follow the training programme. Exercise bands are also useful to help restore muscle strength, especially in multi-directional planes of movement improving the strength and protection around the ankle.
Taping and bracing the ankle can also help to reduce recurrent ankle injury. Previous research has shown the injury incidence in students with taped ankles was 4.9 ankle sprains per 1000 participant games, compared with 2.6 ankle sprains per 1000 participant games in students wearing ankle braces. This compared with 32.8 ankle sprains per 1000 participant games in subjects that had no taping or bracing.
kidney problems
An editorial in Joint Bone Spine has questioned the safety to the kidneys of the new generation of anti-inflammatory medications. The latest non-steroidal anti-inflammatory drugs (NSAIDs) are known as COX 2 inhibitors and their use has been advocated on the basis that they cause fewer side effects to the stomach and kidneys. Although there is evidence that COX-2 inhibitors reduce gastro-intestinal side effects, there is no such proof that these drugs are totally safe for the kidneys.
As with all medications, NSAIDs can have toxic effects on the kidneys. These effects can cause acute kidney failure, water retention, inflammation of the kidney or increased blood pressure. Usually, this is because they have the effect of decreasing blood flow to the kidney and filtration within it. Minor problems can be resolved by simply discontinuing the medication.
Although these conditions can affect anyone, certain people are more susceptible; older people, those with pre-existing kidney problems, diabetics, and those with cardiac problems. Phan et al conclude that COX 2 inhibitors have a similar degree of kidney toxicity to other NSAIDs and advocate physicians identifying high risk patients as the most effective way to prevent side effects. They also advocate using the lowest possible dosage for the shortest possible time.
Phan et al list the risk factors for renal toxicity of NSAIDs:
- Dimished effective arterial volume
- Pre-existing kidney failure
- Congestive heart failure
- Liver cirrhosis
- Nephrotic syndrome
- Volume depletion with dehydration
- Sepsis, anaeathesia
- Diuretics or laxatives
- Renin- angiotensin system inhibitors
- Advanced age
- Chronic kidney failure
- Diabetes
Warning: Always consult a doctor or pharmacist before using any medication. Do not exceed the stated dose of any medication. If your symptoms persist consult your doctor.
Non Steroidal Anti-Inflammatory Drugs (NSAIDs) are commonly used in the treatment of acute sports injuries (Almekinders, 1993). NSAIDs are used primarily for reducing the pain, heat, swelling and redness that is associated with inflammation. The three most commonly used NSAIDs are aspirin (salicylate), acetaminophen, and ibuprofen. Aspirin has many trade names by which it is also known. Acetaminophen is manufactured under the trade name Paracetamol, and also as Tylenol and Datril. Other NSAIDs used in sports medicine include Flurbiprofen (Ansaid), Indomethacin (Indocin), Ibuprofen (Advil, Motrin, Nuprin, Nurofen), Naproxen (Naprosyn) and Diclofenac (Voltaren).
Aspirin is one of the most mis-used drugs because of its wide availability (Davies et al, 1984). It has several modes of action. It interferes with pain signals to a part of the brain called the Thalamus. Aspirin also irreversibly inhibits chemical mediators of inflammation, which produce pain and further inflammatory reactions. These chemicals are released following tissue and cell damage. In addition, aspirin reduces fever by having an effect on the hypothalamus in the brain, which leads to vasodilation and sweating. The side effects of aspirin use include upset stomach, heartburn, nausea, tinnitus (ringing in the ears), headache, and diaorrhea.
Aspirin has an effect on the blood clotting system, which means that bleeding within the damaged tissue may increase. This can increase soft tissue swelling and therefore the duration required for rehabilitation after injury. Although it is an NSAID, Ibuprofen also has analgesic (pain relieving) and antipyretic (fever reducing) effects. It does not affect blood clotting to the same extent as aspirin. Paracetamol (Acetaminophen) does not have significant anti-inflammatory effects, but does have antipyretic and analgesic effects. It is effective in relieving mild pain without upsetting the stomach, which makes it useful for an athlete. Because of possible side effects, all NSAID use should be monitored under the strict supervision of a doctor. There are anecdotal reports that serious gastro-intestinal bleeding leading to hypovolemic shock (blood loss) and anaemia (reduced oxygen to the tissues), have occured in instances where poorly supervised athletes have continued long term use of NSAIDs.
The aim of NSAID use is to reduce the inflammatory response following soft tissue injury. Following an acute soft tissue injury, the inflammatory response is mediated by chemicals which are released by the damaged cells. These chemicals cause blood vessels to open (vasodilation) and blood and cellular fluid to leak into the tissues (extravasation). This causes swelling, pain, redness and a loss of function of the injured part. (Almekinders, 1993). NSAID treatment is an attempt to reduce this response in order that the total rehabilitation time can be reduced.
However, it should be remembered that the inflammatory or ‘lag phase’ is the first stage of the healing process and a degree of pain and loss of function may be helpful to prevent the athlete doing further damage to the injured part. The question of whether NSAIDs have an adverse effect on healing was examined by Obremsky et al (1994) and Almekinders (1986). Both studies showed no significant effect on tensile strength recovery following NSAID treatment for muscle strain injury, and Obremsky et al (1994) further demonstrated that muscular force was also unaltered. However, both studies showed histologic evidence of delayed healing with NSAID use, although it should be stated that both studies utilised animal models.
To conclude, NSAIDs can provide pain relief and a reduction in the signs of inflammation if used in the acute stage of soft tissue injury. However, the precise mechanism and optimum use of these drugs remains unclear. The general concensus is that NSAIDs prescribed by a doctor are appropriate in the early stages of inflammation, but their use should be discontinued as soon as possible, in order to negate any potential adverse effects on the healing process.
Anterior Cruciate Ligament Injury (ACL tear)
The anterior cruciate ligament is located deep in your knee joint and prevents the shin bone (the tibia) from slipping forward from the thigh bone (the femur).
Symptoms:
Following a collision or fall to the ground you will experience an Instant pain in the knee, which increases with weight bearing . You will be unable to play on after this type of knee injury. You may hear a popping sound at the time of the injury and the knee will feel unstable. Swelling will usually occur within 2 hours. You are likely to have reduced range of motion in the knee in the following 48 hours and pain on weight-bearing.
ACL injuries often occur in combination with other injuries, such as meniscal tears, medial collateral ligament (MCL) tears and occasionally fractures and vascular injuries that need immediate medical attention.
Onset:
Is sudden and can be traumatic e.g. a tackle or collision but the majority of cases are actually non -traumatic and occur when quickly changing direction, slowing down or landing .
Aggravating Factors:
Weight-bearing / walking /instability when changing direction or twisting/ pivoting on the knee.
Easing Factors:
Avoiding aggravating factors/ Using Ice and devices to enable you to strengthen whilst reducing the load placed on your e.g a knee support or hydrotherapy belt.
Management:
Some people will have surgery to reconstruct the ACL ligament using either the hamstrings or patellar tendon graft. Others will not undergo surgery but both groups will undergo an intensive course of rehabilitation for around 12 months. Whether your management is surgical or non-surgical your rehab will involve the principles of POLICE. (protection , optimal loading , ice, compression and elevation).
In the acute phase, pain and swelling management is key and can be achieved with the use of ice (cryotherapy products) alongside medication. The use of products such as hydrotherapy belts and braces to offload the knee joint, whilst still allowing for joint movement and muscle strengthening, is advised.
Achieving a normal walking pattern, full knee range of motion and lower limb Strength, kinetic (neuromuscular) control and endurance are all key. Specific drills and tests for a variety of sports under the supervision of a physiotherapist are essential before returning to play.
Knee Injuries Table
This table shows some the key symptoms of the most common knee injuries. We strongly advise that you see healthcare professional rather than attempt to self-diagnose.
If your injury was traumatic and you are unable to weight bare you must seek medical advice immediately. The information pages about each condition, should help to explain the injury that you have and signpost you to how it can be appropriately managed. Remember that wear and tear (degeneration) in your knees is a normal part of ageing. Often people with large amounts of wear and tear on scans have no symptoms and are fully functioning.This information is not intended to replace the advice of a trained medical doctor or physiotherapist. PhysioRoom disclaims any liability for the decisions you make based on this information, which is provided to you on a general information basis only and not as a substitute for personalised medical advice.
Anterior Cruciate Ligament Injury (ACL tear)
The anterior cruciate ligament is located deep in your knee joint and prevents the shin bone (the tibia) from slipping forward from the thigh bone (the femur).
Symptoms:
Following a collision or fall to the ground you will experience an Instant pain in the knee, which increases with weight-bearing . You will be unable to play on after this type of knee injury. You may hear a popping sound at the time of the injury and the knee will feel unstable. Swelling will usually occur within 2 hours. You are likely to have reduced range of motion in the knee in the following 48 hours and pain on weight-bearing.
ACL injuries often occur in combination with other injuries, such as meniscal tears, medial collateral ligament (MCL) tears and occasionally fractures and vascular injuries that need immediate medical attention.
Onset:
Is sudden and can be traumatic e.g. a tackle or collision but the majority of cases are actually non -traumatic and occur when quickly changing direction, slowing down or landing .
Aggravating Factors:
Weight-bearing / walking /instability when changing direction or twisting/ pivoting on the knee.
Easing Factors:
Avoiding aggravating factors/ Using Ice and devices to enable you to strengthen whilst reducing the load placed on your e.g a knee support or hydrotherapy belt.
Management:
Some people will have surgery to reconstruct the ACL ligament using either the hamstrings or patellar tendon graft. Others will not undergo surgery but both groups will undergo an intensive course of rehabilitation for around 12 months. Whether your management is surgical or non-surgical your rehab will involve the principles of POLICE. (protection , optimal loading , ice, compression and elevation).
In the acute phase, pain and swelling management is key and can be achieved with the use of ice (cryotherapy products) alongside medication. The use of products such as hydrotherapy belts and braces to offload the knee joint, whilst still allowing for joint movement and muscle strengthening, is advised.
Achieving a normal walking pattern, full knee range of motion and lower limb Strength, kinetic (neuromuscular) control and endurance are all key. Specific drills and tests for a variety of sports under the supervision of a physiotherapist are essential before returning to play.
Achilles Tendinopathy
Achilles tendinopathy is the term used to describe all of the possible issues with an Achilles tendon including inflammation (tendinitis) or degeneration (tendinopathy). It is now believed that the Achilles tendon is not simply inflamed; instead, the tendon has become thickened and stiffens up.
Although this might sound alarming, degeneration (wear and tear) is largely rectifiable. Achilles tendinopathy can occur at the mid tendon or where the tendon inserts into the heel. If your pain is at the heel, insertion stretching the tendon and eccentric exercises should be avoided.
It is usually caused by training load error, in other words doing too much, too soon. It often occurs in runners who start doing more endurance, hills or speed sessions without adequate rest to allow the tendon to repair and become stronger. It may also happen in sports where there is a lot of sprinting or jumping.
Symptoms:
Symptoms may occur at the start during or after the aggravating activity and include pain / tenderness / stiffness/ swelling / clicking of Achilles tendon. Pain when the tendon is compressed, discomfort when running or walking, especially on an incline/ decline.
Management:
It is worth seeing a physiotherapist to discuss the management of your Achilles tendinopathy. Often in acute (less than 6 weeks since onset) cases a modification of activity with a gradual re- introduction will be sufficient to reduce symptoms. There is strong evidence for the use heavy slow resistance training, eccentric training and concentric training of the calf muscles. There is as yet no strong consensus over which method is the most beneficial and most research promotes a combination of these exercises. In more chronic cases, calf muscles and Achilles tendon strengthening and loading programmes will be required. This will include rest days between runs and not increasing tendon load by more than 10% per week. There is very limited evidence but some patients report that a heel raise reduces symptoms. Generally symptoms improve after 12 weeks of rehab. If the episode continues for 6 months then surgery to remove adhesions may be offered. The use of ice is recommended to reduce pain and some may find that offloading the Achilles tendon by using k-tape is helpful.
Physiotherapy exercises play an important role in the rehabilitation of sports injuries and musculoskeletal problems to develop strength, flexibility and balance. Here at PhysioRoom we have a wide collection of rehab and fitness products that are guaranteed to get you back playing the sport you love in the quickest possible time. Whether your looking to improve your joint stability, reduce the chances of suffering from injury in the future, or looking to strengthen muscle groups, your ideal product will be right here at PhysioRoom.
Guide to Prevention, Treatment & Rehabilitation of a Sprained Ankle
A Sprained Ankle Injury Explained
A sprained ankle is one of the most common injuries caused by participation in sports. It refers to soft tissue damage (mainly ligaments) around the ankle, usually caused by an inversion injury (where the ankle is twisted inwards) or an eversion injury (where the ankle is twisted outwards).
Because of the position of the bones around the ankle, the inversion injury is far more common. This injury causes damage to the lateral ligaments, and other soft tissues, on the outside of the ankle.
The most commonly injured ligament is the anterior talo fibular (ATF) ligament which, as the name suggests, joins the fibular and talus bones together. If the force to the ankle is more severe, the calcaneo fibular ligament (between the calcaneus and fibula) is also damaged. The posterior talo fibular (PTF) ligament is very rarely damaged in comparison to the other two ligaments.
In the case of an eversion injury the damage occurs on the medial (inside) of the ankle. The ligament on the inside of the ankle is called the deltoid ligament and is very strong. It is so strong in fact that the bone on the inside of the ankle can be pulled off, in what is called an avulsion fracture, before the ligament is damaged.
As well as damage to the ligaments, the capsule which surrounds the ankle joint can also be damaged. The damage causes bleeding within the tissues and the ankle begins to swell up and can be extremely painful.
Ankle sprains can be classified as follows:
- First degree, where only a few ligament fibres are damaged
- Second degree sprain refers to more extensive damage to the ligament with associated swelling
- Third degree sprain refers to a complete rupture of the ligament with swelling and a possible joint dislocation
- In the more severe injuries there may be associated bone injury and it is wise to get an x-ray to determine whether there is a fracture.
Sprained Ankle Injury Signs & Symptoms
With a first degree sprain there is pain when turning the foot in or out and also pain when the damaged area is touched. With a second degree sprain the pain is more severe, there is swelling all around the area and it is painful to walk. With a third degree sprain the pain is excruciating and walking is impossible. There is gross swelling and there may be a great degree of joint laxity around the ankle or deformity if the ankle is dislocated.
What you can do
- Consult a sports injury expert
- Apply ice packs/cold therapy to reduce swelling
- Wear a removable plastic cast for protection
- Wear an ankle support for protection
- Wear an ankle support for protection
- Use a wobble board for ankle strengthening
Sprained Ankle Injury Treatment
In the first 48-72 hours following the injury it is important the follow the PRICE protocol – protection, rest, ice, compression and elevation (never apply ice directly to the skin). Ice packs for a period of twenty minutes every couple of hours may help with the pain and help reduce the initial inflammation, but pain-relieving medication may also be necessary. A cryotherapy cuff is the most effective method of providing ice therapy, whilst protecting the injured tissues from further damage, and is the professional’s choice. It can provide continuous ice cold water and compression for 6 hours and significantly reduce pain and swelling in the early stages of injury.
It is important not to put too much weight on the damaged ankle, so walking should be limited where possible. Ankle injuries can be protected using a plastic walker boot cast and these are regularly used by Premier League football players to dissipate weight bearing.
Where a fracture is suspected an x-ray should be carried out at an accident and emergency department. If a fracture is found or a grade three sprain is diagnosed, the advice of the attending doctor should be followed. It should be borne in mind that some hairline fractures do not show up on x-ray until about 10-14 days after the injury, so if the pain persists medical attention should be sought.
In the case of a grade two sprain, crutches should be used to protect the injured ankle. However, it is important not to be on the crutches for longer than necessary and as soon as the pain allows the patient should begin to gently put weight through the ankle by walking to maintain a normal gait pattern and prevent compensatory movements being adopted. Reusable plastic casts can be very helpful as they protect the injured area and help to resolve ankle swelling.
Ligament Damage and Repair Explained
Once the patient is able walk on the ankle, more active rehabilitation can be started.
In ankles that have been repeatedly sprained there is an inherent weakness which may require surgery. This can now be done arthroscopically where a camera is inserted into the ankle and flakes of bone and excess scar tissue can be removed. Because of the injury to vital mechanoreceptors within the ligaments and tendons around the ankle, continuing rehabilitation may be necessary for the months and years that follow an injury. This is because proprioception around the ankle can be greatly compromised with a severe injury and re-injury is often very likely.
Sprained Ankle Rehabilitation
This ankle rehabilitation programme is an example of the progression followed by a professional footballer with a sprained ankle. The principles of rehabilitation apply to all ankle sprain injuries, regardless of the sport. These principles, together with expert input from a healthcare professional can help you recover safely and quickly following a sprained ankle. The progression of the exercises should be based on pain free completion of the previous exercise. All rehabilitation exercises should be preceded by a warm up.
Stage 1: Acute Stage (days 1 to 3)
Follow the PRICE protocol:
Protection
The injured tissues should be protected from further damage. A removable plastic cast is ideal as it helps protect the joint and limit weight bearing. It provides the same protection as a plaster cast but it is lightweight and can be removed by the patient. In the case of Grade 3 ankle sprains crutches should also be used.
Rest
Rest from sports is essential, but even walking on the ankle, if it is painful, may cause further damage and should be avoided. No weight should be put through the injured ankle and crutches should be used. Pain relieving medication prescribed by a doctor may be necessary.
Ice
Ice packs are applied for periods of twenty minutes every couple of hours (never apply ice directly to the skin). The ice packs relieve pain and are thought to reduce bleeding in the damaged tissue. A cryotherapy cuff is the most effective method of providing ice therapy and is the professional’s choice. It can provide continuous ice cold water and compression for 6 hours and significantly reduce pain and swelling.
Compression
A swollen ankle is a sign of a significant ankle sprain. The swelling is caused by bleeding in the tissue and a leaking of cellular fluid secondary to tissue damage. If this swelling is allowed to consolidate it can produce excessive scar tissue and structural changes, which seriously lengthens the rehab period. Compression during the early stages helps to reduce swelling and is essential for a good outcome. Compression is provided by the use of a compression sleeve or brace with intermittent use of a cryo cuff to provide ice and compression.
Elevation
If the ankle is not elevated the effect of gravity causes the tissue fluid to accumulate at the ankle. This can cause increased tissue pressure which is extremely painful. To relieve pain and prevent excessive swelling, the ankle is elevated above waist height.
If the pain allows, the ankle should be removed from the cast and gently pumped forward and back 20 times each hour. This is done by sitting down with the leg elevated and pushing the toes forward and back. This facilitates the dispersal of swelling from the ankle.
Stage 2: Sub-Acute Stage (days 3 to 14)
The sub-acute stage begins by bearing weight on the ankle to pain tolerance. This is graduated from partial weight-bearing with a plastic cast and crutches to full weight-bearing without crutches. A normal walking pattern should be encouraged and there should be no limping.
Ice therapy can be continued so long as there is pain. Compression using the walker boot or ankle brace is continued during walking to encourage the dispersal of swelling. When possible the ankle should be elevated to allow the effect of gravity to help drain swelling away from the injury site. Gentle massage to further encourage the dispersal of swelling towards the back of the knee can also be implemented.
Ankle pumping exercises can be continued and progressed to being done in water. Exercises in water are effective because they involve only partial weight-bearing and because the hydrostatic pressure provided by the water has the effect of encouraging the swelling to disperse.
Exercises in water involve only partial weight-bearing and are effective in helping to disperse swelling.
General fitness is maintained by using a static exercise bike and resistance weight machines in a gym. Resistance Bands may also be used to start to encourage range of movement and gentle strengthening exercises. Different levels of resistance can be used so “light” bands are used at first then as pain, swelling and function all improve the level of resistance can be increased.
Stage 3: Early Rehab (week 3)
After two weeks most of the rehabilitation is achieved through active exercise, although the physiotherapist may help regain range of movement by carrying out massage and passive mobilising techniques. This involves the physio gently moving the bones of the ankle to help restore range of movement and relieve stiffness.
Exercise 1
The first exercise is to help restore the ankles’ range of movement.
Sitting on the floor, the ankle is pumped forward and back.
20 repetitions, 5 times daily.
The patient progresses to doing the same exercise while sitting on a high bench or chair, letting the feet hang down
Exercise 2
This exercise uses a resistance band to strengthen the dorsiflexor muscles that pull the toes back towards the knee.
Sitting on the floor, a resistance band is tied around the foot, with the other end attached to a fixed object in front of the foot.
Slowly the foot is pulled back towards the knee.
20 repetitions, 5 times daily.
As this becomes easier, the resistance band is changed to one that provides more resistance.
Tip: Doubling up the resistance band is an easy way to achieve more resistance.
Exercise 3
This exercise is designed to strengthen the plantar flexor muscles that push the foot down, such as when pushing the pedals of a car.
Sitting on the floor, with the legs out straight, a resistance band is tied around the foot, and the other end held in the hand. Slowly, the foot is pushed forward and then relaxed.
20 repetitions, 5 times daily.
Again, as this becomes easier, the resistance level of the resistance band should be increased.
Exercise 4
This exercise is a progression of the previous plantar flexor strengthening exercises.
The patient stands with their hands resting against a wall so that it is taking some of their body weight. With both feet, the patient pushes up on the toes so the heels rise up off the floor. This position is held for 2 seconds and then the heels are slowly lowered.
20 repetitions, 5 times daily.
Once this becomes easier, the same exercise is done but without any hands against the wall. Once this has been mastered, the patient progresses to doing the exercise with the toes positioned on a block or a step, so that the heels have to come down lower before pushing up.
The final progression to this exercise is to do it on the affected ankle alone.
Exercise 5
This exercise is designed to strengthen the Peroneal muscles that evert the foot and enable the foot to turn outwards. These muscles are also vital for proprioception when returning to sporting activities.
Standing up, the base of the foot is turned outwards, held for 2 seconds and then relaxed.
20 repetitions, 5 times daily.
Proprioception Exercises
Apart from mobilising and strengthening exercises, the rehabilitation for a sprained ankle can be greatly enhanced by practicing what are called proprioception exercises. These enhance neuromuscular control around a joint and are very important to the professional sportsperson, or anybody returning to sports where landing, twisting and turning are necessary. These exercises should be started as soon as pain allows.
The patient balances on the affected leg while partial weight-bearing. This should be done for 1 minute, followed by rest periods to avoid muscular fatigue.
Proprioception exercises can be done while partial weight-bearing first, then progressed to full weight-bearing, such as using a wobble board. The wobble board together with ankle brace are commonly used in the rehabilitation of ankle instability. Wobble boards are designed to assist the re-education of the proprioceptive system by improving sensory nerve function. Research has shown that wobble board training improves single leg stance ability and balance, while other studies have suggested that patients with ankle instability who underwent wobble board training experienced significantly fewer recurrent sprains during a follow-up period than those who did not follow the training programme.
The patient balances on the affected leg for 1 minute, followed by rest periods to avoid muscular fatigue.
Stage 4: Late Rehab (week 4)
Progressive strengthening of the muscles around the ankle should be continued, as should the proprioception exercises. To prepare for a return to functional activities the intensity of exercise should be increased. The use of an ankle brace or ankle taping can provide essential support and confidence at this stage.
Basic plyometric exercises should be commenced.
Jogging should also commence, and should be progressive as follows:
| Day 1 | Jog 100 metres, walk 50 metres, with 6 repetitions. |
| Day 2 | Jog 150 metres, walk 50 metres, with 6 repetitions. |
| Day 3 | Jog 200 metres, walk 50 metres, with 8 repetitions. |
| Day 4 | Jog 200 metres, walk 50 metres, with 12 repetitions. |
| Day 5 | Jog 2000 metres. |
Stage 5: Functional Rehab (week 5+)
The progression to functional activities can begin once the patient can jog without pain and is comfortable doing plyometric drills. The idea of this stage is to progress from gentle exercise to the high intensity at which games are played, by breaking down complex movements and strengthening all of the components. All exercises are preceded by a warm up. As each exercise is a progression they should be completed at least one day apart, under the supervision of a chartered physiotherapist.
Exercise 1
Variable pace running with the gradual introduction of turns.
This involves running round a 20m diameter figure-of-eight course. The figure-of-eight course puts very gentle stress on the ankle and prepares the player for later turning drills. The pace is limited to walk, jog or half pace running and is determined by the physiotherapist who shouts out the desired pace. The physiotherapist also shouts the commands stop and start. This re-introduces the player to the variable demands of a game of football and the Physiotherapist can observe for any compensatory movements that may have resulted from the injury and if not addressed could cause future injuries when returning to activity.
The session should last about 25 minutes.
Exercise 2
Variable pace running with gradual turns and various starting positions.
The player starts at one end of the course and makes a 30m run up to a 20m diameter semicircle, around which they gently turn before completing another straight 30m run back to the finish. The pace of the run is dictated by the physiotherapist and is either a jog or half pace. The starting position should be different for each run (standing, lying on back, lying on front, sprint start position, squatting, right side lying, left side lying, jumping, hopping, facing backwards).
The patient should aim to complete 20 runs.
Exercise 3
A progression of exercise 1 – variable pace running with slightly tighter turns.
Run round a 10m diameter figure-of-eight course. The figure-of-eight course puts stress on the ankle and prepares the player for later turning drills. The paces used are walking, jogging, half pace running, and three-quarter pace running, as determined by the physiotherapist who shouts out the desired pace. The physiotherapist also shouts the commands stop and start.
The session should last about 25 minutes.
Exercise 4
A progression of exercise 2 – variable pace running with gradual turns and various starting positions.
The player starts at one end of the course and makes a 30m run up to a 20m diameter semicircle, around which they gently turn before completing another straight 30m run back to the finish. The pace of the run is either three-quarter or full pace, as dictated by the physiotherapist. The starting position should be different for each run (standing, lying on back, lying on front, sprint start position, squatting, right side lying, left side lying, jumping, hopping, facing backwards).
The player should aim to complete 20 runs
Exercise 5
Two 5m diameter circles are placed 30m apart. Travelling at full pace the player makes a run, with a football at the feet, goes around the far circle and then back to the finish.
This should be repeated 20 times.
Exercise 6
As exercise 5, but single cones are used instead of 5m diameter circles.
Exercise 7
Six cones are placed 5m apart in a straight line. The player completes a shuttle run, at full pace, turning alternately to the left and right.
This should be repeated 10 times
Before a gradual return to full training is considered, the patient should be happy with all normal ball work drills, all types of passing. For instance in football; instep, side foot, front foot, outside of foot, side foot volley, laces volley, half volley, over all distances, heading, jumping and heading, and tackling.
Sprained Ankle Injury Prevention
Ankle instability is characterised by ankle weakness and giving way, even though the ankle ligaments are intact and the joint is mechanically stable. It is due to an impairment of proprioception, which leads to a lack of balance and ankle joint position sense. Proprioception is the mechanism by which nerve receptors in skin, muscle, ligament and joint tissue relay information to the brain about body position sense, where this information is quickly processed and movement strategies are formulated and executed using nerve signals to muscles. This mechanism can help you ‘catch yourself’ when you are about to turn your ankle.
In the unstable ankle these receptors may have been damaged directly during an ankle sprain. The Peroneal muscles and tendons that run along the outside of the shin and are often involved in ankle inversion injuries are particularly rich in receptors. This impaired proprioceptive ability may, therefore, lead to a delay in protective muscle activity and the resultant loss of postural awareness and stability around a joint. This may explain why recurrent ankle sprains are so common.
Wobble Boards together with ankle braces are commonly used in the rehabilitation of ankle instability. Wobble boards are designed to assist the re-education of the proprioceptive system by improving sensory receptor function. Previous research has also shown that wobble board training improves single leg stance ability and balance; while other studies have suggested that patients with ankle instability who underwent wobble board training experienced significantly fewer recurrent sprains during a follow-up period than those who did not follow the training programme. Exercise bands are also useful to help restore muscle strength, especially in multi-directional planes of movement improving the strength and protection around the ankle.
Taping and bracing the ankle can also help to reduce recurrent ankle injury. Previous research has shown the injury incidence in students with taped ankles was 4.9 ankle sprains per 1000 participant games, compared with 2.6 ankle sprains per 1000 participant games in students wearing ankle braces. This compared with 32.8 ankle sprains per 1000 participant games in subjects that had no taping or bracing.
s
What is a Hamstring Muscle Strain?
A hamstring injury is common in sports and are sometimes known as a ‘pulled hamstring’. The term ‘pulled muscle’ comes from the description of how the injury takes place. Usually, the hamstring muscle is forcibly stretched beyond its limits and the muscle tissue becomes torn. A tear in the hamstring muscle is referred to as a hamstring strain by medical professionals and depending on its severity it is classified as a first, second or third degree strain:
- a first degree strain is damage to a few muscle fibres,
- a second degree strain is damage to a more extensive number of muscle fibres,
- a third degree strain is a complete rupture of the muscle itself.
The hamstring muscle group comprises three muscles – biceps femoris, semitendonosus and semimembranosus. The action of these muscles is to bend the knee and extend the hip. Semitendonosis and biceps femoris also have a rotational influence on the knee and lower leg. Semitendonosis attaches into the medial aspect of the tibia via the pes anserine and medially rotates the knee whereas biceps femoris attaches laterally and aids the lateral rotation of the Tibia.
Signs & Symptoms of a Hamstring Injury
With a grade one hamstring strain the signs may not be present until after the activity is over. There may be a sensation of hamstring cramp or hamstring tightness and a slight feeling of pain when the muscles are stretched or contracted.
With a grade two hamstring strain there is immediate pain which is more severe than the pain of a grade one injury. It will make the individual stop mid-run and is confirmed by pain on stretch and contraction of the muscle. A grade two Hamstring strain is usually sore to touch.
A grade three hamstring strain is a very serious injury. There is an immediate burning or stabbing pain and the athlete is unable to walk without pain. The muscle is completely torn and there may be a large lump of muscle tissue above a depression where the tear is. After a few days with grade two and three injuries a large bruise will appear below the injury site caused by the bleeding within the tissues.
Hamstring Injury Treatment
What you can do
- Consult a sports injury expert
- Apply ice packs to relieve pain
- Apply compression bandage to control bleeding & swelling
- Use resistance bands for muscle strengthening exercises
- Wear compression shorts or a thigh support for reassurance during rehabilitation
The immediate treatment of a hamstring muscle injury consists of the RICE protocol – rest, ice, compression and elevation (never apply ice directly to the skin). This is aimed at reducing the bleeding and damage within the hamstring muscle tissue. Resting may be the common sense approach, but it is one that is often ignored by competitive athletes. This is unwise, since it does not take much to turn a grade one hamstring strain into a grade two, or a grade two hamstring strain into a grade three. As a general rule, grade one hamstring strains should be rested from sporting activity for about 3 weeks and grade two injuries for about 4 to 6 weeks. In the case of a complete rupture, the hamstring muscle will have to be repaired surgically and the rehabilitation afterwards will take about 3 months.
Regardless of the severity of the hamstring injury the treatment in the first few days is the same. The hamstring should be rested in an elevated position with an ice pack applied for twenty minutes every two hours, if practical (never apply ice directly to the skin). A compression bandage should be applied to limit bleeding and swelling in the tissues. After the early stages have been spent resting, more active rehabilitation can be started. Compression shorts or thigh supports may be used to support the injury and provide reassurance as activity is re-started.
Once pain-free, gentle resistance exercises and stretching are important as they help to align the scar tissue that forms during the healing process. By aligning the scar tissue along the normal lines of stress the tensile strength of the hamstring is enhanced.
At first gentle resistance is provided by a therapist, but as the muscle gets stronger then resistance bands can provide more of a challenge. The sets and repetitions are gradually increased and eventually core strengthening can be started.
Core strength and core stability exercises can improve muscle function across the trunk and pelvis and this can reduce the risk of hamstring injury. Increased gluteal strength will also lessen the load placed upon the hamstring group in high speed, powerful or explosive movements. Core strength exercises on a mat using a swiss ball and resistance bands are ideal. Once core strength and hamstring strength are improved, then a return to functional activity is possible. With a grade one hamstring strain gentle jogging can be initiated between seven and nine days after injury and straight line sprinting is usually started after 3 weeks. Many people find that compression shorts and thigh supports provide reassurance during this active rehabilitation.
Hamstring Injury Prevention
What you can do
- Warm up before sporting activities
- Cool down following sporting activities
- Stretch regularly to maintain muscle length
- Replenish carbohydrates during sporting activity with energy bars & gels
- Wear compression shorts or a thigh support to retain muscle warmth
The following measures may have the effect of reducing the risk of sustaining a Hamstring muscle strain:
Warm up prior to matches and training is thought to decrease muscle stretch injuries because the muscle is more extensible when the tissue temperature has been increased by one or two degrees. A good warm up should last at least 20 minutes – starting gently and finishing at full pace activity. Practising sport specific activities helps tune coordination and prepare mentally for competition. Compression shorts or a thigh support can be helpful for retaining muscle tissue temperature, ensuring that the tissue remains extensible even in colder weather.
Recovery after training sessions and matches can be enhanced by performing a cool down. This is thought to help muscles get rid of waste products. This is also the ideal time to do stretching exercises, whilst the muscle is warm and pliable.
Maintaining good muscle strength and flexibility may help prevent muscle strains. Muscle strength allows a player to carry out match activities in a controlled manner and decreases the uncoordinated movements which can lead to injury. The stronger the muscle is, especially when eccentrically loaded (lengthened) the more tolerant it is to the demands of intense sport and activity. A physiotherapist can help identify any muscle imbalances that may make an individual more susceptible to hamstring injuries. Weak glute muscles may place greater stress on the hamstrings to extend the hip. Tight or dominant quadriceps may also place the hamstrings under excess strain. Therefore a thorough assessment can help individualise a rehab programme. Tight muscles are associated with strains. Stretching sessions using a gym mat can be helpful to maintain muscle length and prevent injury.
Diet can have an affect on muscle injuries. If a player’s diet is high in carbohydrate in the 48 hours before a match there will be a adequate supply of the energy that is necessary for muscle contractions. However, if the muscles become short of fuel, fatigue can set in during training or matches. This fatigue can predispose a player to injury. Carbohydrate can be replenished during training and matches by taking energy bars and gels.
Rehabilitation for a Hamstring Injury
Grade One Hamstring Strain Rehabilitation
Days 1 to 5
RICE protocol – rest, ice, compression and elevation (never apply ice directly to the skin). The hamstring should be rested in an elevated position with an ice pack applied for twenty minutes every two hours, if practical (never apply ice directly to the skin). A compression bandage should be applied to limit bleeding and swelling in the tissues. After the early stages have been spent resting, more active rehabilitation can be started.
Days 6 to 10
Gentle Hamstring stretching can begin, sitting on a gym mat and slowly bending forward, sliding the hands down the thighs. The patient should stop when the tension of a stretch in the hamstring begins to be felt – the position should then be held for thirty seconds. Repetitions x 3. This should be pain-free.
Gentle resistance exercises can begin under the supervision of a qualified therapist. Early, gentle, pain free stretching and strengthening against light force provided by the therapist can help to align the scar tissue, which is forming to heal the muscle tear. This ultimately produces a stronger scar.
Days 11 to 14
Free exercises to strengthen the hamstring muscles can begin.
The patient starts by sitting on the gym mat and sliding the heel up to the bottom. Repetitions x 20, 3 times each day. If this can be done without pain, progress to the next position can be made.
The patient lies on their front and brings the heel up to the bottom. Repetitions x 20, 3 times each day. If this can be done without pain, progress to the next position can be made.
Standing, the patient brings the heel up to the bottom. Repetitions x 20, 3 times each day.
Hamstring stretches are also continued.
Days 15 to 17
Intermittent jogging and walking can begin.
5 minutes at first, then build up in 5 minute increments. Once the patient can do 15 minutes they should build up to to half pace running.
Squats can begin – repetitions x 20, 3 times daily.
Hamstring curls using a resistance weight machine can also begin.
Everything should be pain-free.
Day 18+
Backward running can begin.
If pain-free, the patient progresses to full pace forward running.
The patient continues stretching and strengthening exercises.
The patient begins sports specific activities.
Grade Two Hamstring Strain Rehabilitation
Days 1 to 5
RICE protocol – rest, ice, compression and elevation (never apply ice directly to the skin). This is aimed at reducing the bleeding and damage within the muscle tissue.
Days 6 to 11
Gentle hamstring stretching can begin, sitting on a gym mat and slowly bending forward, sliding the hands down the thighs. The patient should stop when the tension of a stretch in the hamstring begins to be felt – the position should then be held for thirty seconds. Repetitions x 3.
This should be pain-free.
Each day the patient should be able to stretch a little further.
Gentle resistance exercises can begin under the supervision of a qualified therapist. Early, gentle, pain free stretching and strengthening against light force provided by the therapist can help to align the scar tissue, which is forming to heal the muscle tear. This ultimately produces a stronger scar.
Days 12 to 19
Free exercises to strengthen the hamstring muscles can begin.
The patient starts by sitting on the gym mat and sliding the heel up to the bottom. Repetitions x 20, 3 times each day. If this can be done without pain, progress to the next position can be made.
The patient lies on their front and brings the heel up to the bottom. Repetitions x 20, 3 times each day. If this can be done without pain, progress to the next position can be made.
Standing, the patient brings the heel up to the bottom. Repetitions x 20, 3 times each day.
Hamstring stretches are also continued.
Days 20 to 26
Intermittent jogging and walking can begin.
5 minutes at first, then build up in 5 minute increments. Once the patient can do 15 minutes they should build up to to half pace running.
Squats can begin – repetitions x 20, 3 times daily.
Hamstring curls using a resistance weight machine can also begin.
Everything should be pain-free.
Day 27+
Backward running can begin.
If pain-free, the patient progresses to full pace forward running.
The patient continues stretching and strengthening exercises.
The patient begins sports specific activities.
Grade 3 Hamstring Strain (Complete Rupture) Rehabilitation
Follow the advice of an orthopaedic consultant.
Soccer
Researchers in the United States have examined the effect of soccer heading on postural control in a group of forty college soccer players, with the findings published in The British Journal of Sports Medicine. Similar studies by previous authors have examined soccer heading as a potential source of long term brain injury, similar to that seen in some boxers.
Broglio et al used a randomised controlled method to assess the effects of heading a soccer ball fired from an automated machine and a simulation of this action (i.e. the player jumped and rotated the head as if heading the ball) on the player’s subsequent ability to balance on a force plate.
During the discussion section, the authors compared the effects of a boxing punch and heading a football. Broglio et al cite previous research that reported a single punch acceleration of 53g from a professional boxer, compared with peak accelerations from headed footballs that can range from 49.3 to 54.7g when kicked at 3540 mph from 30 yards away. While it is difficult to dispute this data, the question must be asked, ‘Would you rather be punched in the head by a professional boxer, or header a football that has been crossed from 35 yards away?’
Broglio et al concluded that soccer heading in a controlled environment does not appear to be acutely detrimental to postural control. Their findings suggest that no acute changes in postural control result from heading drills involving 20 balls at a fixed speed. Further long term follow up studies may still be helpful to examine the chronic effects of regular soccer heading, as in the case of an elite level central defender, who may practise heading several times each week for a period of 15 to 20 years.
Physiotherapy In Sport
One of Chelsea FC’s physiotherapists has investigated the relationship between hamstring muscle length and hamstring muscle strains. Andy Rolls, of ‘The Blues’ and Keith George of Liverpool John Moores University have published their findings in a very interesting article in Physical Therapy in Sport.
They examined 111 academy footballers aged between 9 and 19 years old using standard measures of hamstring extensibility. Chelsea FC medical staff recorded hamstring injuries during the following competitive season, during which time 16 players suffered hamstring injury. The authors then investigated the relationship between the two main variables.
Rolls and George state that inadequate hamstring muscle length has historically been thought of as a possible cause of hamstring injury. However, the results of previous research on hamstring muscle length and injury are varied and the nature of the relationship between the two variables has not been established.
This study showed that the highest percentage of hamstring muscle injuries in academy soccer players occurred in the 1719 age-group (39%) and the authors felt that this may be explained by the fact that at this age the subjects are in full time training and are normally playing 13 games a week. In the younger age groups below 16 years of age, the young footballers’ hours of activity are closely monitored and limited. The authors suggest that the greater hamstring injury rate is related to a greater potential exposure to training and matches.Overall the authors found that there were no statistically significant differences when injured and non-injured subjects were compared for their hamstring length. This would suggest that hamstring strain was not dependent hamstring tightness.
What is Plantar Fasciitis?
Plantar fasciitis or a better term is actually plantar fasciopathy is a common foot condition that causes heel pain and pain in the sole of the foot. Plantar fasciiopathy is an overload injury and associated with a degenerative process similar to tendinopathy but in the toplantar fascia, a fibrous sheath that runs most of the length of the sole of the foot. It attaches between the heel bone and the bones at the base of the toes, covering the small muscles in the sole of the foot. During walking and running, as you ‘toe-off’, the plantar fascia becomes taut and helps the foot act as a lever to push off with force. It is one of the primary stabilising structures of the arch on the inner side of the foot.
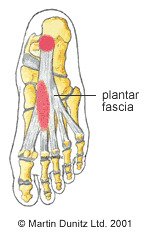
What Causes Plantar Fasciitis & Who is Affected by it?
Plantar fasciitis or a better term is actually plantar fasciopathy is a common foot condition that causes heel pain and pain in the sole of the foot. Plantar fasciiopathy is an overload injury and associated with a degenerative process similar to tendinopathy but in the toplantar fascia, a fibrous sheath that runs most of the length of the sole of the foot. It attaches between the heel bone and the bones at the base of the toes, covering the small muscles in the sole of the foot. During walking and running, as you ‘toe-off’, the plantar fascia becomes taut and helps the foot act as a lever to push off with force. It is one of the primary stabilising structures of the arch on the inner side of the foot.
Plantar Fasciitis Symptoms
Plantar fasciitis produces foot pain over the inside of the heel and this usually radiates down the inside of the sole of the foot. This foot pain usually occurs with activity and is also typically present in the morning when taking the first steps of the day or when standing after prolonged sitting. The band tightens up with inactivity and then loosens as you walk and move around again.
How Do I Know If I Have Plantar Fasciitis?
Plantar fasciitis can be diagnosed by a doctor or physiotherapist, if pain is present on touching the affected area, and/or on stretching the plantar fascia (by pulling the toes up). The diagnosis of plantar fasciitis can be confirmed on an ultrasound scan, when the fascia has a thickened appearance. In a small number of cases of heel pain, that fails to respond to normal treatment, it may be necessary to get an x-ray to rule out other conditions such as a bony spur on the heel bone or a fracture of the heel bone.
How to Treat Plantar Fasciitis
- Consult a sports injury expert
- Apply ice packs/cold therapy for pain relief
- Stretching and strengthening exercises
- Wear a night splint to stretch the plantar fascia
- Tape the foot for effective treatment
- Support the inner arch with insoles
In most sporting individuals the cause is overuse and the most important advice is to allow adequate rest, to take some of the strain off the plantar fascia and embark on a graduated loading and stretching programme. The foot and ankle supports can be effective in the treatment of plantar fasciitis. Plantar fasciitis supports are designed to reduce strain on the plantar fascia and apply compression to help reduce swelling and discomfort.
Plantar Fasciitis Insoles
In some cases of plantar fasciitis there may be a problem with the biomechanics of the foot, contributing to the problem. The usual findings are a foot that ‘over pronates’, where the inner arch of the foot rolls over too much during walking and running. This can lead to tightness in the achilles tendon and recent research has suggested that a tight achilles tendon can increase strain on the plantar fascia. An insole that supports the inner arch of the foot can help to remedy this. Stiff joints around the foot and ankle can be treated using mobilisation, where the physiotherapist gently moves the joints manually to remove the stiffness and restore the normal range of movement. Conversely, there may be excessive ‘pronation’ and an insole that supports the inner arch of the foot may be helpful in alleviating strain on the plantar fascia.
Conservative Massage Treatment
Conservative treatment, such as physiotherapy, aims to reduce local inflammation, give a personalised programme of exercises and stretches to follow and address any biomechanical problems. The plantar fascia is continuous with the gastrocnemius and soleus muscles of the calf. Therefore relief may be provided by massage to these muscles and reducing the strain on the plantar fascia. An effective self-treatment technique can ease out tension in the calf using a massage stick. Massage under the foot if pain allows which may help reduce symptoms. While the plantar fascia is still painful it may be treated with ice packs (never apply ice directly to the skin) and anti-inflammatory drugs prescribed by a doctor. Stretching and strengthening exercises should be progressed as pain allows.
Can stretching cure plantar fasciitis?
Stretching the plantar fascia (by pulling the toes towards the shin) is effective in encouraging the tissue to regain its normal alignment. This helps the healing process and can relieve the symptoms of Plantar Fasciitis. Prolonged stretching of the plantar fascia can be achieved using a night splint which is worn during sleep. Some research indicates that night splinting can significantly reduce plantar fasciitis symptoms in over 80% of cases – particularly pain on the first few steps after waking up each morning. The best conservative approach is thought to be a combination of both stretching and strengthening.
Does KT Tape work for plantar fasciitis?
Taping has been shown to be an effective treatment for plantar fasciitis for some. The kinesiology tape supports the Plantar Fascia and removes some of the strain on the achilles tendon and plantar fascia that can aggravate the condition.
Invasive Treatments: Cortisone Injections & Surgery
Plantar fasciitis settles with conservative treatment in 95% of cases. For the more chronic cases there have been reported good results from extracorporeal shock wave therapy (ECSWT)
However, in severe cases where heel pain is affecting normal walking then an injection with a mixture of corticosteroid and local anaesthetic is sometimes helpful. Following this injection, the patient is required to rest for a few days, then normal activities can be resumed gradually.
How do you know if you need surgery for plantar fasciitis?
In persistent cases of plantar fasciitis, that fail to respond to 6 months of conservative treatment, then surgery can be considered. In the past, surgical techniques have included removal of bony spurs from the heel bone and release of the plantar fascia from the heel bone itself, but the results were inconsistent. These invasive surgeries often caused later problems such as nerve damage and changes to the mechanics of the foot.
If ongoing problems and no response to conservative management then a referral to an orthopaedic or podiatric surgeon is recommended.
Ultrasound Guided Needle Fasciotomy: An Alternative to Invasive Surgery
A modern treatment approach for plantar fasciitis is an ultrasound guided needle fasciotomy. This is a minimally invasive procedure where a needle is inserted into the plantar fascia and moved back and forwards to disrupt the fibrous tissue that proliferates as a result of the chronic inflammation. Because a needle is used instead of a scalpel, and because the whole procedure is observed using an ultrasound scanner, then there is far less danger of surgical complications. By disrupting the tight fibrous tissue the strain on the plantar fascia is relieved and healing can take place.
How to Prevent Plantar Fasciitis
- Support the inner arch with a foot support to limit excess pronation
- Wear shoes that provide adequate support for the foot. Unsuitable footwear can increase strain of the plantar fascia and lead to the development of inflammation.
- Insoles that support the arch on the inner side of the foot can be helpful for limiting excessive pronation and relieving stress on the plantar fascia and achilles tendon.
- Self massage to the calf muscles (gastrocnemius and soleus) using a massage stick, strengthening exercises for the arch and stretching are all effective ways of easing the symptoms of plantar fasciitis at home.
How to Prevent Plantar Fasciitis
- Monitor weight
- Watch loading and increase activity levels steadily
- Support the inner arch with a foot support to limit excess pronation
- Wear shoes that provide adequate support for the foot. Unsuitable footwear can increase strain of the plantar fascia and lead to the development of inflammation.
- Insoles that support the arch on the inner side of the foot can be helpful for limiting excessive pronation and relieving stress on the plantar fascia and achilles tendon.
- Self massage to the calf muscles (gastrocnemius and soleus) using a massage stick, strengthening exercises for the arch and stretching are all effective ways of easing the symptoms of plantar fasciitis at home.
ACL reconstruction
Orthopaedic surgeons at Stepping Hill Hospital, Stockport, UK retrospectively compared the arthroscopic findings of 75 patients at the time of diagnosis of ACL rupture and the findings at the time of ACL reconstruction surgery. This was achieved by reviewing operation notes on patients who had undergone primary ACL reconstruction performed by the senior author between March 1998 and December 2000.
For inclusion in the study, the patients had to have undergone a prior diagnostic athroscopy of the knee performed by the senior author. All patients in the study had subsequently undergone primary arthroscopic ACL reconstruction using a hamstring graft.
The study group consisted of 61 men and 14 women. The age at injury ranged from 12 to 51 with the mean and median age at injury being 26. Sporting injuries accounted for the mechanism of injury in 54 patients (72%). The mechanism of injury was a road traffic accident in one case and unknown or not documented in the remaining 11 patients.
The authors state that the natural history of the knee following ACL rupture is one of progressive degenerative change. Repeated episodes of giving way due to instability result in recurrent trauma to the articular surfaces and menisci. Ultimately, this can lead to osteoarthritis of the knee joint. The purpose of ACL reconstruction is to restore stability, reduce progressive joint damage and to allow the athlete to return to sporting activities.
The authors found that 35 of the total number of patients (46.6%) had some deterioration in arthroscopic appearance in the interval between diagnosis and reconstruction. Twenty-five of the patients had an interval time between surgeries of less than 6 months and of these patients four (16%) developed a further lesion. The remaining 49 patients had an interval time greater than 6 months and of these patients 31 (63%) had developed a further lesion.
Foster et al found that the most common deterioration since the diagnostic arthroscopy was a meniscal tear, which occurred in 22 patients (62.9% of those with deterioration), followed by degeneration of the articular surface of the knee joint (28.6%, 10 patients) and osteochondral lesions (damage to the bone underneath the articulr surface, representing14.3%, five patients).
The optimal timing for ACL reconstruction is thought to be 2 to 4 weeks following injury. Reconstruction earlier than this, where joint swelling is still present increases the incidence of ‘arthrofibrosis’, where the thickened graft leads to a restriction of knee joint movement. The findings of this study would suggest that in those patients where ACL reconstruction is indicated, particularly in young athletes, a delay (of greater than six months) in reconstructive surgery has a negative effect on the articular surface of the knee.
Non Steroidal Anti-Inflammatory Drugs (NSAIDs)
Warning: Always consult a doctor or pharmacist before using any medication. Do not exceed the stated dose of any medication. If your symptoms persist consult your doctor.
Non Steroidal Anti-Inflammatory Drugs (NSAIDs) are commonly used in the treatment of acute sports injuries (Almekinders, 1993). NSAIDs are used primarily for reducing the pain, heat, swelling and redness that is associated with inflammation. The three most commonly used NSAIDs are aspirin (salicylate), acetaminophen, and ibuprofen. Aspirin has many trade names by which it is also known. Acetaminophen is manufactured under the trade name Paracetamol, and also as Tylenol and Datril. Other NSAIDs used in sports medicine include Flurbiprofen (Ansaid), Indomethacin (Indocin), Ibuprofen (Advil, Motrin, Nuprin, Nurofen), Naproxen (Naprosyn) and Diclofenac (Voltaren).
Aspirin is one of the most mis-used drugs because of its wide availability (Davies et al, 1984). It has several modes of action. It interferes with pain signals to a part of the brain called the Thalamus. Aspirin also irreversibly inhibits chemical mediators of inflammation, which produce pain and further inflammatory reactions. These chemicals are released following tissue and cell damage. In addition, aspirin reduces fever by having an effect on the hypothalamus in the brain, which leads to vasodilation and sweating. The side effects of aspirin use include upset stomach, heartburn, nausea, tinnitus (ringing in the ears), headache, and diaorrhea.
Aspirin has an effect on the blood clotting system, which means that bleeding within the damaged tissue may increase. This can increase soft tissue swelling and therefore the duration required for rehabilitation after injury. Although it is an NSAID, Ibuprofen also has analgesic (pain relieving) and antipyretic (fever reducing) effects. It does not affect blood clotting to the same extent as aspirin. Paracetamol (Acetaminophen) does not have significant anti-inflammatory effects, but does have antipyretic and analgesic effects. It is effective in relieving mild pain without upsetting the stomach, which makes it useful for an athlete. Because of possible side effects, all NSAID use should be monitored under the strict supervision of a doctor. There are anecdotal reports that serious gastro-intestinal bleeding leading to hypovolemic shock (blood loss) and anaemia (reduced oxygen to the tissues), have occured in instances where poorly supervised athletes have continued long term use of NSAIDs.
The aim of NSAID use is to reduce the inflammatory response following soft tissue injury. Following an acute soft tissue injury, the inflammatory response is mediated by chemicals which are released by the damaged cells. These chemicals cause blood vessels to open (vasodilation) and blood and cellular fluid to leak into the tissues (extravasation). This causes swelling, pain, redness and a loss of function of the injured part. (Almekinders, 1993). NSAID treatment is an attempt to reduce this response in order that the total rehabilitation time can be reduced.
However, it should be remembered that the inflammatory or ‘lag phase’ is the first stage of the healing process and a degree of pain and loss of function may be helpful to prevent the athlete doing further damage to the injured part. The question of whether NSAIDs have an adverse effect on healing was examined by Obremsky et al (1994) and Almekinders (1986). Both studies showed no significant effect on tensile strength recovery following NSAID treatment for muscle strain injury, and Obremsky et al (1994) further demonstrated that muscular force was also unaltered. However, both studies showed histologic evidence of delayed healing with NSAID use, although it should be stated that both studies utilised animal models.
To conclude, NSAIDs can provide pain relief and a reduction in the signs of inflammation if used in the acute stage of soft tissue injury. However, the precise mechanism and optimum use of these drugs remains unclear. The general concensus is that NSAIDs prescribed by a doctor are appropriate in the early stages of inflammation, but their use should be discontinued as soon as possible, in order to negate any potential adverse effects on the healing process.
Maternity Belts for Back Pain During Pregnancy
Back pain, especially sacro iliac joint dysfunction, can occur during pregnancy due to ligamentous laxity as the pelvis enlarges. Supporting the back and your bump with a maternity belt not only eases back pain but promotes good posture by correcting the alignment of the spine. Promoting good posture is beneficial as doing so helps to maintain good circulation, while helping with balance and easy breathing.
We have dual-purpose pregnancy support belts designed to be used during and after pregnancy. During pregnancy, the support belt supports the foetus by providing some light compression underneath the abdomen. It also supports the lumbar spine and sacroiliac joint – both of which are put under strain during pregnancy. The support belt can be reversed (and once the metal stays are reversed) can be used after pregnancy to support the lax ligaments and muscles around the pelvis, which helps to reduce the occurrence of back pain post pregnancy whilst the body regains its original shape.
We also have maternity belts which provide support for the lower back and SacroIliac joint (SI joint), as well as the ‘bump’. Hormonal changes during pregnancy produce lax ligaments which mean that expectant mothers commonly suffer from SI joint dysfunction and lower back pain, such as Sciatica, a herniated disc and posture related back ache. Further stress can be put on the lower back and SacroIliac joint as a result of the baby’s growth and the subsequent expansion of the mother’s tummy. Support belts provide the ideal solution as it supports the bump as well as the lower back and SacroIliac joint, which is very effective in relieving aches and pains during pregnancy.